Units View
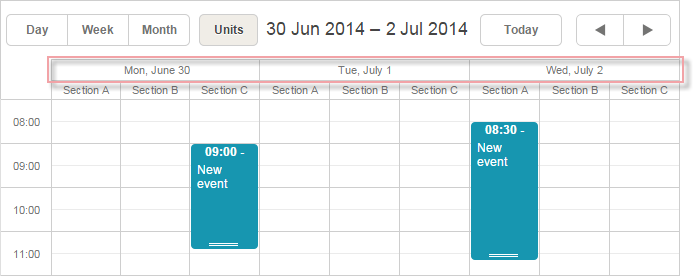
The Units view is a view, where X-Axis is based on some property of events (not only on time).

Initialization
To initialize the Units view and add it to the scheduler, use the code below:
public ActionResult Index() {
    var sched = new DHXScheduler(this);
    ...
    var unit = new UnitsView("unit1", "room_id");//initializes the view
    sched.Views.Add(unit);//adds the view to the scheduler

    return View(sched);
}
where
- unit1 - the name of the view.
The constructor requires the 'name' cause the view can exist in the scheduler in several instances. - room_id - the name of a property used as the id of units
Properties
To configure the Units view, make use of the properties below:
- Label - (string) the text label. The default value - 'Units'
- Name - (string) the name of the view. Applicable just to the Units and Timeline views cause they can be presented in the scheduler in several instances. For other views the property is read-only and names are taken by default
- Property - (string) the name of a property by which events are divided to units
- Size - (integer) the number of units to be displayed on the screen at a time
- SkipIncorrect - (boolean) skips (doesn't display) events which belong to none of the defined units. If the parameter is set to false, such events are presented in the first unit. The default value - false
- Step - (integer) the scroll step
- TabClass - (string) the name of the CSS class that will be applied to the tab
- TabPosition - (integer) the right offset of the view tab in the tabbar. By default, tabs go right-to-left in the order of addition to the scheduler
- TabStyle - (string) the style that will be applied to the tab
- TabWidth - (integer) the width of the tab
- ViewType - (string) the type of the view. The property is read-only
Data for X-Axis
In general, to set values for the X-Axis, you should use the AddOptions() method.
The method can take 2 types of data:
- Object of the Unit class (IEnumerable<Unit>)
unit.AddOption( new Unit("1", "Room 1"));
- Object of any class inherited from System.Object (IEnumerable<object>)
var rooms = new List<object>(){
    new { key = "1", label = "Room 1"},
    new { key = "2", label = "Room 2"},
    new { key = "3", label = "Room 3"}
};
unit.AddOptions(rooms);
Note, to be correctly processed data items must have 2 mandatory properties:
- key - the id of an item;
- label - the text label of an item.
Assigning an event to multiple sections of the view
A single event can be assigned to several sections of the Timeline or Units view.

To enable multisection events:
- Enable SchedulerExtensions.Extension.Multisection extension
- Optionally, you can add a Multiselect control to your lightbox configuration, in order to be able to assign options from the UI
var scheduler = new DHXScheduler(this);
scheduler.Extensions.Add(SchedulerExtensions.Extension.Multisection);

var units = new UnitsView("units", "y_property");

var options = new object[]{
    new {key = 1, label = "Section #1" },
    new {key = 2, label = "Section #2" },
    new {key = 3, label = "Section #3" },
    new {key = 4, label = "Section #4" }
};

units.AddOptions(options);
scheduler.Views.Add(units);
Optional multiselect configuration:
scheduler.Lightbox.Add(new LightboxText("text", "Title"));

var multiselect = new LightboxMultiselect("y_property", "Sections");
multiselect.AddOptions(options);
scheduler.Lightbox.Add(multiselect);

scheduler.Lightbox.Add(new LightboxMiniCalendar("time", "Time"));
After that, the related property of an event can contain several sections (by default, separated with comma) and the event will be displayed in all specified properties:
public ContentResult Data()
{
var evs = new List<object>{
new { text = "First", start_date = new DateTime(2014, 8, 1), end_date = new DateTime(2014, 8, 4), y_property = "1,3"},
new { text = "Second", start_date = new DateTime(2014, 8, 3), end_date = new DateTime(2014, 8, 5), y_property = "2,4"},
new { text = "Third", start_date = new DateTime(2014, 8, 2), end_date =new DateTime(2014, 8, 8), y_property = "1"},
new { text = "Fourth", start_date = new DateTime(2014, 8, 4), end_date = new DateTime(2014, 8, 5), y_property = "3"}
};
Â
return Content(new SchedulerAjaxData(evs).Render());
}
Loading sections from the server
Scheduler supports loading Timeline and Units options with the data response.
In order to do so, you need to specify a 'ServerList' property of the Units view, the name is arbitrary:
var unit = new UnitsView("unit", "section_id");
scheduler.Views.Add(unit);
unit.ServerList = "sections";
During data loading you can add a list of timeline options to the SchedulerAjaxData object (note that the name of the list must be the same in both places, 'sections' in this example)
var data = new SchedulerAjaxData(events);
Â
data.ServerList.Add("sections", new List<object>{
new { key = "1", label = "Section 1" },
new { key = "2", label = "Section 2" },
new { key = "1", label = "Section 3" }
});
After that sections will be refreshed on the client automatically. See more details.
Showing multiple days
A number of displayed days can be specified in the Days property of the UnitsView object:
var unit = new UnitsView("unit", "section_id");
unit.Days = 7;//full week
scheduler.Views.Add(unit);

A view can contain any number of days. Note, that the Step and Scroll properties can't be used when UnitsView shows several days.