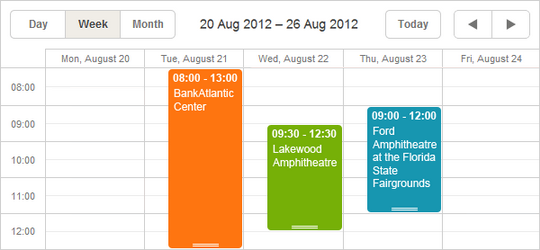
Custom Event Color
There are 2 variants to set a custom color for event(s):
- To specify color values in properties of the event object
- To attach additional CSS classes to events

Setting Color Values in Properties of Event Object
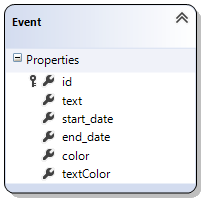
To set a custom color value for a specific event, you need to add 2 data properties (or one of them) to the model:
- textColor (defines the font color)
- color (defines the background color)
Note, these are special properties. By default, scheduler always checks whether an event has them. If the event does, scheduler applies the related values to the event container and text. Otherwise, scheduler uses predefined colors for the event.
The properties can have any valid CSS color value, e.g. all the following notations are valid:
- ev.color = "#FF0000";
- ev.color = "red";
- ev.color = "rgb(255,0,0)";

public class Event
{
    public int id { get; set; }
    public string text { get; set; }
    public DateTime? start_date { get; set; }
    public DateTime? end_date { get; set; }
    public string color { get; set; }
    public string textColor { get; set; }
}
So, to color events, you can directly specify the required values in the model or apply the values according to some rule in the controller (read more in the related chapter - Updating data from the server-side).
Attaching Additional CSS Classes to Events
The other way to color events is to apply additional CSS classes to them.
CSS classes are applied with the help of the template event_class (read more about templates here).
The default implementation of the template is:
scheduler.templates.event_class = function(start, end, ev){
  return "";
}
The function returns string that will be added to the event class. So, you can return different classes depending on the event state.
Parameters:
- start - the date when an event is scheduled to begin.
- end - the date when an event is scheduled to be completed.
- ev - the event object.
Let's assume that you want to have events assigned to managers and employees in different colors: in the green color for managers and in orange for employees. In this case, we do 2 things:
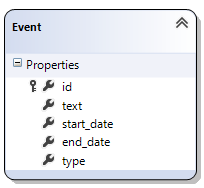
1 . Set an additional data property to the model and name it, for example 'type'. The property will store the type of the user : 'manager' or 'employee'.

2 . Specify the related CSS classes for these types, e.g. they will be named as 'manager_event' and 'employee_event'. The CSS definition will look as in:
<style>
        /*event in day or week view*/
        .dhx_cal_event.manager_event div{
            background-color: #009966 !important;
            color: black !important;
        }
        .dhx_cal_event.employee_event div{
            background-color: #FF9933 !important;
            color: black !important;
        }
        /*multi-day event in month view*/
        .dhx_cal_event_line.manager_event{
            background-color: #009966 !important;
            color: black !important;
        }
        .dhx_cal_event_line.employee_event{
            background-color: #FF9933 !important;
            color: black !important;
        }
        /*event with fixed time, in month view*/
        .dhx_cal_event_clear.manager_event{
            color: black !important;
        }
        .dhx_cal_event_clear.employee_event{
            color: black !important;
        }
</style>
3 . Finally, override the event_class template:
scheduler.templates.event_class = function (start, end, event) {
    if (event.type == 'manager') return "manager_event";
    return "employee_event";
};