- Downloading and Installing Scheduler .NET
- How to apply the license key?
- Simple ASP.NET WebForms Application with Scheduler
- Simple ASP.NET MVC Application with Scheduler
- Scheduler .NET with Entity Framework Database First
- Step 1. Create an MVC Web Application
- Step 2. Install Packages via NuGet
- Step 3. Create a Controller and a View
- Step 4. Set up a Database
- Step 5. Generate Models
- Step 6. Add Possibility to Load and Save Data
- Scheduler .NET with Entity Framework Code First
Scheduler .NET with Entity Framework Database First
There are three ways you can work with data in the Entity Framework, depending on what you start developing with:
- Model First
- Code First
- or Database First.
This tutorial is for dedicated to the Database First approach. Here you will find the information on how to start with an existing database and quickly create a simple event calendar in .NET with basic views and functionality like on the picture below:

The Entity Framework 6 and MVC 5 will be used to build the web application.
This topic addresses the situation where you have a database and want to generate code for a web application based on the fields of that database.
This approach is called Database First Development. If you do not have an existing database yet, you can use the approach called Code First Development instead. It involves defining data classes and generating the database from the class properties.
Step 1. Create an MVC Web Application
Open Visual Studio and create a new C# Web project
Name the new project "EventCalendarEFDatabaseFirst":

- Select an Empty template and check the MVC option below the list of templates:

Step 2. Install Packages via NuGet
Right click on your project in the solution explorer and select Manage NuGet Packages.
It will open Manage NuGet Packages dialog box. Now, select Online in the left bar and search for DHTMLX Scheduler .NET for ASP.NET:

After that find the EntityFramework package:

Step 3. Create a Controller and a View
At this step, create a controller and name it CalendarController.cs. It includes the default Index() method. Change the controller code to the following:
public class CalendarController : Controller
    {
        public ActionResult Index()
        {
            var sched = new DHXScheduler(this);
            sched.Skin = DHXScheduler.Skins.Terrace;
            sched.LoadData = true;
            sched.EnableDataprocessor = true;
            sched.InitialDate = new DateTime(2016, 5, 5);
            return View(sched);
        }
    }
Right click the Views\Calendar folder and click Add, then click MVC 5 View Page with (Layout Razor). Add the following markup.
@{
Layout = null;
}
Â
Â
<!DOCTYPE html>
<html>
<head>
<title>DHXScheduler initialization sample</title>
<style>
body {
background-color: #eee;
}
</style>
</head>
<body>
<div style="height:700px;width:900px;margin:0 auto">
@Html.Raw(Model.Render())
</div>
</body>
</html>
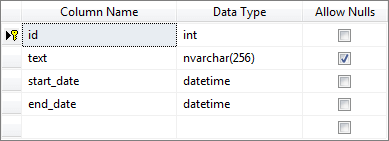
Step 4. Set up a Database
At this step, create a database to store the calendar events. In this database create the 'Events' table with the following fields (all fields are mandatory):
- id - (int; primary key, identity) the ID of the event;
- text - (nvarchar(256)) the description of the event;
- start_date - (datetime) the date and the time the event starts;
- end_date - (datetime) the date and the time the event ends.
CREATE TABLE [Events](
  [id] int IDENTITY(1,1) NOT NULL,
  [text] nvarchar(256) NULL,
  [start_date] datetime NOT NULL,
  [end_date] datetime NOT NULL,
  PRIMARY KEY (id)
)
While the DB tool is open, you can add some data to the table.
Step 5. Generate Models
You will now create the Entity Framework models from the database tables. These models are classes that you will use to work with data. Each model mirrors a table in the database and contains properties that correspond to the columns in the table.
- Right-click the "Models" folder, and select "Add" and "New Item".
- In the Add New Item window, select Data in the left pane and look for ADO.NET Entity Data Model among the options in the center pane. Name the new model file "Events".

- Click "Add". In the Entity Data Model Wizard select Generate from database.

- Click "Next". If you have database connections defined within your development environment, you may see one of these connections pre-selected.
Now you need to create a new connection to the database you've created in the first part of this tutorial.
- Click the New Connection button.

- In the Connection Properties select the CalendarDb.mdf from the available databases.

- Click OK. The correct connection properties are now displayed. You can use the default name for connection to the Web.Config file.

- Click "Next". Select Tables to generate models for all three tables.

- Click "Finish". If you receive a security warning, select OK to continue running the template.
After that the models will be generated from the database tables, and a diagram that shows the properties will be displayed.

Step 6. Add Possibility to Load and Save Data
At this stage we need to provide the data loading and saving functionality in the CalendarController.cs controller.
To enable loading and processing of data in Scheduler, add the code as in:
public ContentResult Data()
   {
     return (new SchedulerAjaxData(
       new CalendarContext().Events
         Select(e => new { e.id, e.text, e.start_date, e.end_date })
         )
      );
   }
To enable data saving, add the required entities as follows:
public ContentResult Save(int? id, FormCollection actionValues)
{
var action = new DataAction(actionValues);
var changedEvent = DHXEventsHelper.Bind<Event>(actionValues);
var entities = new CalendarContext();
try
{
switch (action.Type)
{
case DataActionTypes.Insert:
entities.Events.Add(changedEvent);
break;
case DataActionTypes.Delete:
changedEvent = entities.Events.FirstOrDefault(ev => ev.id == action.SourceId);
entities.Events.Remove(changedEvent);
break;
default:// "update"
var target = entities.Events.Single(e => e.id == changedEvent.id);
DHXEventsHelper.Update(target, changedEvent, new List<string> { "id" });
break;
}
entities.SaveChanges();
action.TargetId = changedEvent.id;
}
catch (Exception a)
{
action.Type = DataActionTypes.Error;
}
Â
return (new AjaxSaveResponse(action));
}
Here is the full code of the CalendarController:
public class CalendarController : Controller
{
public ActionResult Index()
{
var sched = new DHXScheduler(this);
sched.Skin = DHXScheduler.Skins.Terrace;
sched.LoadData = true;
sched.EnableDataprocessor = true;
sched.InitialDate = new DateTime(2016, 5, 5);
return View(sched);
}
Â
Â
public ContentResult Data()
{
return (new SchedulerAjaxData(
new CalendarDbEntities().Events
.Select(e => new { e.id, e.text, e.start_date, e.end_date })
)
);
}
Â
Â
public ContentResult Save(int? id, FormCollection actionValues)
{
var action = new DataAction(actionValues);
var changedEvent = DHXEventsHelper.Bind<Events>(actionValues);
var entities = new CalendarDbEntities();
try
{
switch (action.Type)
{
case DataActionTypes.Insert:
entities.Events.Add(changedEvent);
break;
case DataActionTypes.Delete:
changedEvent = entities.Events.FirstOrDefault(ev => ev.id == action.SourceId);
entities.Events.Remove(changedEvent);
break;
default:// "update"
var target = entities.Events.Single(e => e.id == changedEvent.id);
DHXEventsHelper.Update(target, changedEvent, new List<string> { "id" });
break;
}
entities.SaveChanges();
action.TargetId = changedEvent.id;
}
catch (Exception a)
{
action.Type = DataActionTypes.Error;
}
Â
Â
return (new AjaxSaveResponse(action));
}
}
Finally, open RouteConfig.cs in the App_Start folder and update the controller route from 'Home' to 'Calendar' as it's shown below:
public static void RegisterRoutes(RouteCollection routes)
{
routes.IgnoreRoute("{resource}.axd/{*pathInfo}");
Â
routes.MapRoute(
name: "Default",
url: "{controller}/{action}/{id}",
defaults: new { controller = "Calendar", action = "Index", id = UrlParameter.Optional }
);
}
An event calendar with Entity Framework is ready. Check it in the browser and try to create events.