- Scheduler .NET with NHibernate
- Scheduler .NET with Connector
- ASP.NET Event Calendar in Visual Basic
- ASP.NET Event Calendar in MVC3 Razor
- Scheduler in ASP.NET MVC3/MVC4 in 5 Steps
- Room Booking Calendar for ASP.NET
- Making Preparations
- Step 1. Database and Model Creation
- Step 2. Creating Controllers and Views
- Step 3. Authentication and Basic Functionality
- Step 4. User Authentication
- Room Booking Calendar in MVC3 Razor
- Dynamic Loading and Airy Events in MVC3 Razor Room Booking Calendar
- Car Rental Application in ASP.NET MVC3 Razor
- Task Manager in MVC5
- Hotel Room Booking Calendar in ASP.NET MVC5
- 7 Steps To Appointment Calendar Template in ASP.NET MVC5
Room Booking Calendar for ASP.NET
From our previous tutorials you could have learned how to get a basic ASP.NET MVC event calendar and a simple ASP.NET scheduling solution for your application.
In this tutorial we decided to show how you can extend the functionality of our web-control to create an online room booking calendar or other reservation service. For your convenience, we have provided the tutorial with code snippets, screenshots and detailed descriptions.
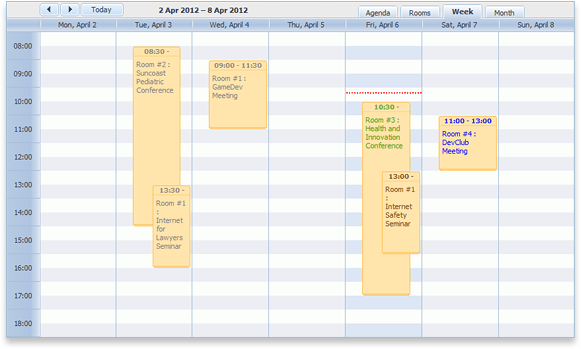
The online booking calendar we are going to build looks like the one in the picture below:
You can also check this online demo. Sign up and get the final package.
Making Preparations
To begin with, download the latest update of DHTMLX Scheduler .NET. The initial steps (1-4) to create project and a database are set in the documentation.
As far as it's going to be an online booking service, let's name it RoomBookingCalendar.
We have introduced some new features in this booking application:
1 . All users should be authorized to add events to the calendar
2 . Every user has access only to his events which he can modify or delete
3 . Expired calendar events can't be deleted or edited
4 . Only one room for one event can be selected from a drop-down list
5 . Different event colors are set for different users
6 . Agenda and Room views in addition to Week and Month views
Step 1. Database and Model Creation
First of all, you have to build up a user infrastructure. We decided to use a built-in ASP.NET Membership.
To implement this, run the ASP.NET SQL Server Registration Tool. It can be found here: C:\WINDOWS\Microsoft.NET\Framework\v.1-4\aspnet_regsql.exe. This tool will automatically create the tables listed below:
1 . aspnet_Applications
2 . aspnet_Membership
3 . aspnet_SchemaVersions
4 . aspnet_Users
Run this tool with the following keys:
aspnet_regsql.exe -E -S <servername> -d <databasename> -A m
All rooms and users' information will be stored in the calendar database. Let's create two tables: "Rooms" and "Events". The Rooms table should have only two columns:

where:
- [key] is the ID of the room
- label is the name of the room
The Events table should look like this:
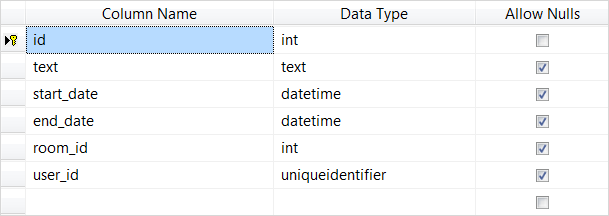
Here we have added two new columns: room_id (ID of the room) and user_id (ID of the user) to link users and rooms with calendar events; the text column contains text data type in this case.
Note that a primary key and an identity column should be enabled for [key] and id.
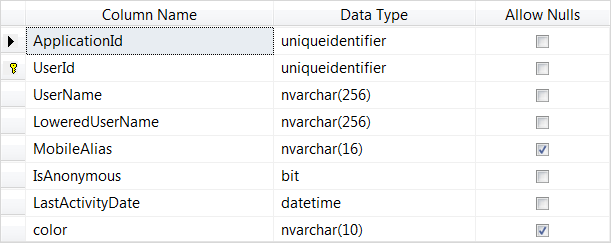
In the table "aspnet_Users" we have to add one more column "color" to set the color of calendar events for each user:
Once you've added all tables to your booking calendar project, you can set up models. Right-click on the folder Model -> Add New Item. Select LINQ to SQL Classes and create a new data model (e.g. MyEvents.dbml).
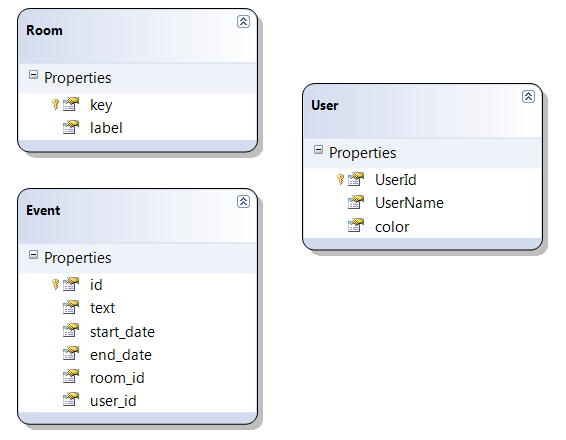
Now you can get down to the creation of models. The models are created for only three tables: Rooms, Events and aspnet_Users, which you drag from the Server Explorer to the designer area. The aspnet_Users model should have only "UserId", "UserName" and color properties, the rest should be removed. Rename this model into "User".
In the end, your calendar database should look like this:
Step 2. Creating Controllers and Views
In addition to AccountController.cs generated by default, create a BookingController.cs file with the three methods set below:
using RoomBookingCalendar.Models;
using DHTMLX.Scheduler;
using DHTMLX.Common;
using DHTMLX.Scheduler.Data;
namespace RoomBookingCalendar.Controllers
{
    public class BookingController : Controller
    {
        public ActionResult Index()
        {
            var sched = new DHXScheduler(this);


            return View(sched);
        }

        public ActionResult Data()
        {
            return (new SchedulerAjaxData((new MyEventsDataContext()).Events));
        }

        public ActionResult Save(int? id, FormCollection actionValues)
        {
            var action = new DataAction(actionValues);
            var changedEvent = (Event)DHXEventsHelper.Bind(typeof(Event), actionValues);
            MyEventsDataContext data = new MyEventsDataContext();

                try
                {
                    switch (action.Type)
                    {
                        case DataActionTypes.Insert:
                            data.Events.InsertOnSubmit(changedEvent);
                            break;
                        case DataActionTypes.Delete:
                            changedEvent = data.Events.SingleOrDefault(ev => ev.id == action.SourceId);
                            data.Events.DeleteOnSubmit(changedEvent);
                            break;
                        default:// "update"
                            var eventToUpdate = data.Events.SingleOrDefault(ev => ev.id == action.SourceId);
                            DHXEventsHelper.Update(eventToUpdate, changedEvent, new List<string>() { "id" });
                            break;
                    }
                    data.SubmitChanges();
                    action.TargetId = changedEvent.id;
                }
                catch(Exception a)
                {
                    action.Type = DataActionTypes.Error;
                }

            return new AjaxSaveResponse(action);
        }
    }
}
Remember to change the redirect path from "Home" to "Booking" in the AccountController.cs.
Then go to Views -> Shared -> Site.Master that has been generated automatically when you created a new project. Amend the coding in the following manner:
<%@ Master Language="C#" Inherits="System.Web.Mvc.ViewMasterPage" %>
<!DOCTYPE html>
<html>
<head id="Head1" runat="server">
    <title><asp:ContentPlaceHolder ID="TitleContent" runat="server" /></title>
    <link href="../../Content/Site.css" rel="stylesheet" type="text/css" />
</head>

<body>
    <div class="page">
        <div id="main">
            <asp:ContentPlaceHolder ID="MainContent" runat="server" />

            <div id="footer">
            </div>
        </div>
    </div>
</body>
</html>
Let's create a booking calendar page by adding a new folder "Booking" to Views and creating "Index.aspx":
<%@ Page Title="" Language="C#"  MasterPageFile="~/Views/Shared/Site.Master" Inherits="System.Web.Mvc.ViewPage<dynamic>" %>
<asp:Content ID="pageTitle" ContentPlaceHolderID="TitleContent" runat="server">
    Booking Calendar
</asp:Content>
<asp:Content ID="mainContent" ContentPlaceHolderID="MainContent" runat="server">
<style>#footer
{
    display:none;
}
#main
{
    height:510px;
}
</style>
    <div id="logindisplay">
        <% Html.RenderPartial("LogOnUserControl"); %>
    </div>
    <%= Model.Render() %>

</asp:Content>
Now go to Content -> Site.css and remove all unnecessary styles, except for those presented below:
body
{
    background-color: #5c87b2;
    font-size: .75em;
    font-family: Verdana, Helvetica, Sans-Serif;
    margin: 0;
    padding: 0;
    color: #696969;
}

a:link
{
    color: #034af3;
    text-decoration: underline;
}
a:visited
{
    color: #505abc;
}
a:hover
{
    color: #1d60ff;
    text-decoration: none;
}
a:active
{
    color: #12eb87;
}

.page
{
    width: 90%;
    margin-left: auto;
    margin-right: auto;
}

#logindisplay
{
    font-size:1.1em;
    display:block;
    text-align:right;
    margin:10px;
    color:White;
}

#logindisplay a:link
{
    color: white;
    text-decoration: underline;
}

#logindisplay a:visited
{
    color: white;
    text-decoration: underline;
}

#logindisplay a:hover
{
    color: white;
    text-decoration: none;
}
Proceed with changing the default route to "booking" in Global.asax:
new { controller = "Booking", action = "Index", id = UrlParameter.Optional } // Parameter defaults
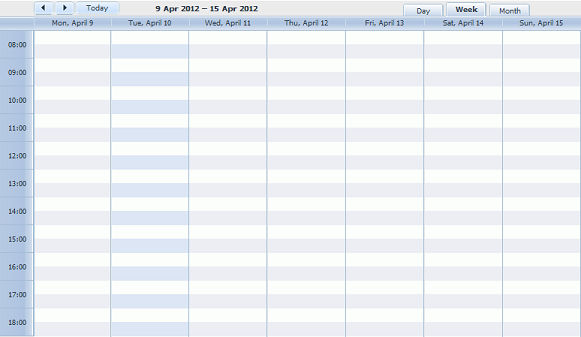
A simple online booking calendar will look like an ordinary ASP.NET event calendar with only Day, Week and Month views:
Step 3. Authentication and Basic Functionality
When you succeed with the above steps, create one more model Calendar.Models.cs for your events by right-clicking on Model -> Class. Add the following coding:
using System;
using System.Collections.Generic;
using System.Linq;
using System.Web;
using DHTMLX.Scheduler;
namespace RoomBookingCalendar.Models
{
    public class CalendarModel
    {
        public string Rooms { get; set; }
        public string Colors { get; set; }
        public DHXScheduler Scheduler { get; set; }
    }
}
1 . Set user permissions. Scheduler .NET will create rules allowing logged in users to amend only their events and forbidding not logged in users to edit any events in the calendar:
sched.SetEditMode(EditModes.OwnEventsOnly, EditModes.AuthenticatedOnly);
2 . Connect the extension forbidding to add several events at a time:
sched.Extensions.Add(SchedulerExtensions.Extension.Collision);
3 . Connect the extension forbidding to add events in the past:
sched.Extensions.Add(SchedulerExtensions.Extension.Limit);
4 . Customize other calendar settings:
sched.Config.first_hour = 8;
sched.Config.last_hour = 19;
sched.XY.scroll_width = 0;
sched.Config.time_step = 30; // minimum event length
sched.Config.multi_day = true;
sched.Config.limit_time_select = true;

sched.Config.cascade_event_display = true;

// The required client-side handlers have to be added after Scheduler initialization but before events load.
sched.AfterInit = new List<string>() { "attachRules();" };

sched.LoadData = true;
sched.PreventCache();

if (Request.IsAuthenticated)
{
    sched.EnableDataprocessor = true;
}
Then we should customize views by removing DayView and adding units and WeekAgendaView:
sched.Views.Items.RemoveAt(2);//remove DayView

var units = new UnitsView("rooms", "room_id");

units.Label = "Rooms";
units.AddOptions(context.Rooms);
sched.Views.Add(units);
sched.Views.Add(new WeekAgendaView());
Note that context is MyEventsDataContext throughout the code.
Let's set a lightbox by adding a control that allows users to choose a room:
var select = new LightboxSelect("room_id", "Room");
select.AddOptions(context.Rooms);
sched.Lightbox.AddDefaults();
sched.Lightbox.Items.Insert(1, select);
Customize settings for authorized users:
if (Request.IsAuthenticated)
{
   var user = context.Users.SingleOrDefault(u => u.UserId == (Guid)Membership.GetUser().ProviderUserKey);
   sched.SetUserDetails(user, "UserId");// render the current user to scheduler
   // User ID is assigned to his newly added events. Specify the property to be used for this purpose.
   sched.Authentication.EventUserIdKey = "user_id";
   sched.InitialValues.Add("textColor", user.color); // set default values
   sched.InitialValues.Add("room_id", context.Rooms.First().key);
}
Now bind a model to render it in view.
At first, connect a namespace for serialization:
using System.Web.Script.Serialization;
Information about rooms and events' colors is used in the client-side API. It should be rendered to the client side.
The information will be kept in the model as serialized to JSON, that's why rooms and colors properties have the String type:
var serializer = new JavaScriptSerializer();
var rooms = serializer.Serialize(context.Rooms);
var colors = serializer.Serialize(
 (from us in context.Users select new { id = us.UserId.ToString(), color = us.color })
    .ToDictionary(t => t.id.ToLower(), t => t.color));
return View(new CalendarModel() { Rooms = rooms, Colors = colors, Scheduler = sched });
To verify whether the user is authorized or not and whether he's trying to edit someone else's events or past events, we add the following logic to the Save action (that will be also double-checked on the client-side API):
if (Request.IsAuthenticated && changedEvent.user_id == (Guid)Membership.GetUser().ProviderUserKey && changedEvent.start_date > DateTime.Now)
{
…
}
else
{
    action.Type = DataActionTypes.Error;
}
Here is the full code of controller:
using System;
using System.Collections.Generic;
using System.Linq;
using System.Web;
using System.Web.Mvc;

using System.Web.Security;

using DHTMLX.Common;
using DHTMLX.Scheduler;
using DHTMLX.Scheduler.Authentication;
using DHTMLX.Scheduler.Controls;
using DHTMLX.Scheduler.Data;
using RoomBookingCalendar.Models;
using System.Web.Script.Serialization;

namespace RoomBookingCalendar.Controllers
{
    public class BookingController : Controller
    {
        protected void _ConfigureLightbox(DHXScheduler sched, MyEventsDataContext context)
        {
            var select = new LightboxSelect("room_id", "Room");
            select.AddOptions(context.Rooms);
            sched.Lightbox.AddDefaults();
            sched.Lightbox.Items.Insert(1, select);
        }

        protected void _ConfigureViewsAndTemplates(DHXScheduler sched, MyEventsDataContext context)
        {
            sched.Views.Items.RemoveAt(2);//remove DayView

            var units = new UnitsView("rooms", "room_id");

            units.Label = "Rooms";
            units.AddOptions(context.Rooms);
            sched.Views.Add(units);
            sched.Views.Add(new WeekAgendaView());


        }

        protected void _ConfigureScheduler(DHXScheduler sched, MyEventsDataContext context)
        {
            sched.SetEditMode(EditModes.OwnEventsOnly, EditModes.AuthenticatedOnly);
            sched.Extensions.Add(SchedulerExtensions.Extension.Collision);
            sched.Extensions.Add(SchedulerExtensions.Extension.Limit);


            sched.Config.first_hour = 8;
            sched.Config.last_hour = 19;
            sched.XY.scroll_width = 0;
            sched.Config.time_step = 30;
            sched.Config.multi_day = true;
            sched.Config.limit_time_select = true;

            sched.Config.cascade_event_display = true;


            sched.AfterInit = new List<string>() { "attachRules();" };

            sched.LoadData = true;
            sched.PreventCache();

            if (Request.IsAuthenticated)
            {
                sched.EnableDataprocessor = true;
            }
        }
        protected void _HandleAuthorization(DHXScheduler sched, MyEventsDataContext context)
        {
            if (Request.IsAuthenticated)
            {
                var user = context.Users.SingleOrDefault(u => u.UserId == (Guid)Membership.GetUser().ProviderUserKey);
                sched.SetUserDetails(user, "UserId");
                sched.Authentication.EventUserIdKey = "user_id";

                sched.InitialValues.Add("textColor", user.color);
                sched.InitialValues.Add("room_id", context.Rooms.First().key);
            }

        }


        public ActionResult Index()
        {
            var sched = new DHXScheduler(this);
            var context = new MyEventsDataContext();

            _ConfigureScheduler(sched, context);
            _ConfigureViewsAndTemplates(sched, context);
            _ConfigureLightbox(sched, context);
            _HandleAuthorization(sched, context);


            var serializer = new JavaScriptSerializer();
            var rooms = serializer.Serialize(context.Rooms);
            var colors = serializer.Serialize(
                (from us in context.Users select new { id = us.UserId.ToString(), color = us.color })
                    .ToDictionary(t => t.id.ToLower(), t => t.color));


            return View(new CalendarModel() { Rooms = rooms, Colors = colors, Scheduler = sched });
        }

        public ActionResult Data()
        {
            return (new SchedulerAjaxData((new MyEventsDataContext()).Events));
        }

    public ActionResult Save(int? id, FormCollection actionValues)
    {
        var action = new DataAction(actionValues);
            var changedEvent = (Event)DHXEventsHelper.Bind(typeof(Event), actionValues);
            MyEventsDataContext data = new MyEventsDataContext();

            if (Request.IsAuthenticated && changedEvent.user_id == (Guid)Membership.GetUser().ProviderUserKey && changedEvent.start_date > DateTime.Now)
            {

                try
                {
                    switch (action.Type)
                    {
                        case DataActionTypes.Insert:
                            data.Events.InsertOnSubmit(changedEvent);
                            break;
                        case DataActionTypes.Delete:
                            changedEvent = data.Events.SingleOrDefault(ev => ev.id == action.SourceId);
                            data.Events.DeleteOnSubmit(changedEvent);
                            break;
                        default:// "update"
                            var eventToUpdate = data.Events.SingleOrDefault(ev => ev.id == action.SourceId);
                            DHXEventsHelper.Update(eventToUpdate, changedEvent, new List<string>() { "id" });
                            break;
                    }
                    data.SubmitChanges();
                    action.TargetId = changedEvent.id;
                }
                catch(Exception a)
                {
                    action.Type = DataActionTypes.Error;
                }
            }
            else
            {
                action.Type = DataActionTypes.Error;
            }

            return new AjaxSaveResponse(action);
        }

    }
}
Go to Index.aspx to add the required client scripts. Create a tag script and render model data to the page:
// list of rooms
var rooms = <%=Model.Rooms %> ;
var colors = <%=Model.Colors %> ;

// Add a helper that we'll need later:
// returns room name by id
function getRoom(id) {
    for (var i in rooms) {
        if (rooms[i].key == id)
        return rooms[i].label;
    }
    return "";
}
Declare the function "attachRules" mentioned above and make the following updates:
1 . block the past calendar events:
var isEditable = function(event_id){
    if(!event_id)
        return true;
    var ev = scheduler.getEvent(event_id);
        return (ev && ev.start_date.getTime() > new Date().getTime());
};

scheduler.attachEvent("onBeforeLightbox", isEditable);
scheduler.attachEvent("onBeforeDrag", isEditable);
scheduler.attachEvent("onClick", isEditable);
scheduler.attachEvent("onDblClick",isEditable);
scheduler.attachEvent("onEventCreated", function(event_id){
    scheduler.config.limit_start = new Date();// refresh limit extension settings
});
2 . Set colors for loaded events (we do not keep colors in the model so they should be specified additionally):
scheduler.attachEvent("onEventLoading", function(event_object){
    if(event_object.user_id && colors[event_object.user_id]){
        if(event_object.start_date.getTime() < new Date().getTime()){
            event_object.textColor = "gray";
        }
        else{
            event_object.textColor = colors[event_object.user_id];
        }
    }
    return true;
});
scheduler.config.limit_start = new Date();
3 . Change the template of an event label to display the room name:
scheduler.templates.event_text = scheduler.templates.agenda_text =
scheduler.templates.event_bar_text = function(start,end,ev){
    return getRoom(ev.room_id)+' : ' + ev.text;
}
scheduler.templates.week_agenda_event_text = function(start,end,ev){
    return scheduler.templates.event_date(ev.start_date) + ' ' +getRoom(ev.room_id)+' : ' + ev.text;
}
The full code will look like this:
<%@ Page Title="" Language="C#"  MasterPageFile="~/Views/Shared/Site.Master" Inherits="System.Web.Mvc.ViewPage<dynamic>" %>
<asp:Content ID="pageTitle" ContentPlaceHolderID="TitleContent" runat="server">
    Booking Calendar
</asp:Content>

<asp:Content ID="mainContent" ContentPlaceHolderID="MainContent" runat="server">
<style>
#footer
{
    display:none;
}
#main
{
    height:510px;
}
</style>

    <script>
        //list of rooms
        var rooms = <%=Model.Rooms %> ;
        var colors = <%=Model.Colors %> ;
        //returns room name by id
        function getRoom(id) {
            for (var i in rooms) {
                if (rooms[i].key == id)
                    return rooms[i].label;
            }
            return "";
        }

        function attachRules(){
        //check is event belongs to the user and is it not started yet
            var isEditable = function(event_id){
                  if(!event_id)
                    return true;
                  var ev = scheduler.getEvent(event_id);
                  return (ev && ev.start_date.getTime() > new Date().getTime());
            };

            scheduler.attachEvent("onBeforeLightbox", isEditable);
            scheduler.attachEvent("onBeforeDrag", isEditable);
            scheduler.attachEvent("onClick", isEditable);
            scheduler.attachEvent("onDblClick",isEditable);
            scheduler.attachEvent("onEventCreated", function(event_id){
                  scheduler.config.limit_start = new Date();
            });
            scheduler.attachEvent("onEventLoading", function(event_object){
        if(event_object.user_id && colors[event_object.user_id]){
                    if(event_object.start_date.getTime() < new Date().getTime()){
                        event_object.textColor = "gray";
                    }else{
                        event_object.textColor = colors[event_object.user_id];
                    }
                }
                return true;
        });

            scheduler.templates.event_text = scheduler.templates.agenda_text = scheduler.templates.event_bar_text = function(start,end,ev){
                return getRoom(ev.room_id)+' : ' + ev.text;
            }
            scheduler.templates.week_agenda_event_text = function(start,end,ev){
                return scheduler.templates.event_date(ev.start_date) + ' ' +getRoom(ev.room_id)+' : ' + ev.text;
            }
        }

    </script>
    <div id="logindisplay">
                <% Html.RenderPartial("LogOnUserControl"); %>
    </div>
    <%= Model.Render() %>

</asp:Content>
Step 4. User Authentication
There are several steps to user authentication. At first, customize the Web.config file as it is shown below:
<membership defaultProvider="CustomMembershipProvider">
    <providers>
     <clear/>
      <add name="CustomMembershipProvider" type="System.Web.Security.SqlMembershipProvider"
        connectionStringName="bookingConnectionString"
        enablePasswordRetrieval="false"
        enablePasswordReset="true"
        requiresQuestionAndAnswer="false"
        requiresUniqueEmail="false"
        maxInvalidPasswordAttempts="5"
        minRequiredPasswordLength="1"
        minRequiredNonalphanumericCharacters="0"
        passwordAttemptWindow="10"
        applicationName="/" />
 </providers>
</membership>
We have added three users with the following names/passwords: guest1/ guest1, guest2/ guest2 and guest3/ guest3 to log in this room booking calendar. Colors for users and the required number of rooms are set in the database.
Tip: To add rooms, right-click on the table Rooms -> New Query -> Rooms and copy this line:
INSERT INTO Rooms (label) VALUES ('Room #1'), ('Room #2'),('Room #3'),('Room #4')
New users for the booking calendar are created by using the Web Site Administration Tool that you can access via ASP.NET configurations.
Make final customizations to Index.aspx. Update Model.Render() to Model.Scheduler.Render():
<div id="logindisplay">
    <% Html.RenderPartial("LogOnUserControl"); %>
</div>
<%= Model.Scheduler.Render() %>
You can also set additional styles to your online booking calendar. For example, change the calendar background or the authorization field.
After completing all the above steps, you get a ready online booking calendar service with a user login form and Agenda, Rooms, Week and Month views. View online demo.
Save up your time! Sign up and get the final package.