- Scheduler .NET with NHibernate
- Scheduler .NET with Connector
- ASP.NET Event Calendar in Visual Basic
- ASP.NET Event Calendar in MVC3 Razor
- Scheduler in ASP.NET MVC3/MVC4 in 5 Steps
- Room Booking Calendar for ASP.NET
- Room Booking Calendar in MVC3 Razor
- Dynamic Loading and Airy Events in MVC3 Razor Room Booking Calendar
- Car Rental Application in ASP.NET MVC3 Razor
- Task Manager in MVC5
- Hotel Room Booking Calendar in ASP.NET MVC5
- 7 Steps To Appointment Calendar Template in ASP.NET MVC5
7 Steps To Appointment Calendar Template in ASP.NET MVC5
This simple tutorial demonstrates how to build an appointment calendar in ASP.NET MVC5 (C#). We will use our flexible web control to build a calendar together with Entity Framework (CodeFirst) and Bootstrap.
The calendar we are going to create supports all up-to-date .NET frameworks and development environments (i.e. ASP.NET 4.5 and Visual Studio 2012 or newer).
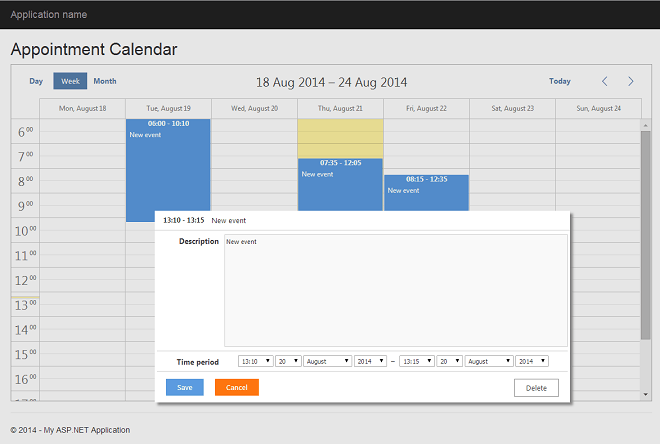
After you finish all the steps, you'll get an Ajax-enabled flat-skin calendar template in ASP.NET MVC5 with basic functionality, namely:
- Basic views: day, week and month
- Convenient drag-and-drop
- Highlighted current day
- Dynamic data loading and saving
The created ASP NET calendar scheduler for your appointments will look like this one:
Besides, you can download a ready calendar template with all work done for you:
note If you use Visual Studio 2012 to build a calendar app, be sure to install Visual Studio 2012 Update 4, which adds MVC5 support
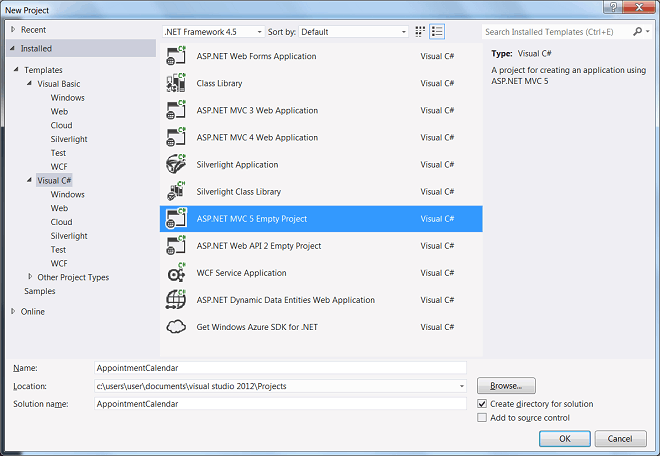
Step 1. Create ASP.NET MVC5 Project
We'll build an appointment calendar in VS 2012 Express for Web, Update 4. If you use any other VS version, there shouldn't be any substantial changes.
Let's create an empty MVC5 (C#) project in VS 2012 Express and name it AppointmentCalendar.
Step 2. Create a Model with Entity Framework
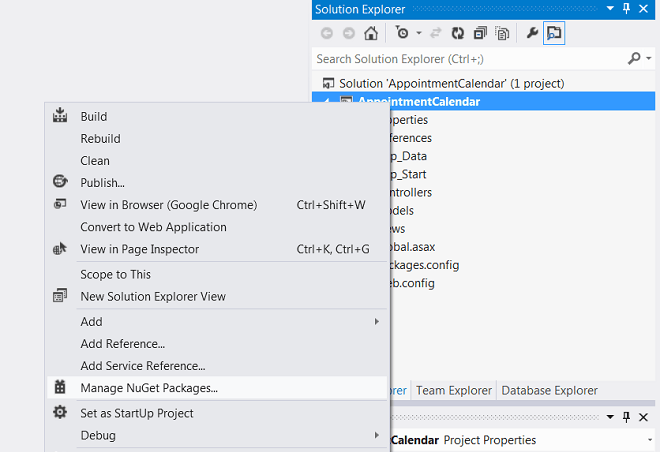
Right-click the AppointmentCalendar project in the Solution Explorer and select Manage NuGet Packages. Install Entity Framework and start creating a Model.
We use a Code First approach for creating the model. It means that we'll define classes for our model and database context, and Entity Framework will generate database tables (or/and the database itself) when they will be needed.
If you want to learn more about EF Code First, you may check these tutorials from MSDN: creating models for a new database and adding models to an existing database.
Creating an Appointment model
To create an Appointment model class, right-click Models, select Add and add a class Appointment.cs. Add the code below:
using System;
using System.Collections.Generic;
using System.Linq;
using System.Web;
using System.Data.Entity;

using System.ComponentModel.DataAnnotations;
using System.ComponentModel.DataAnnotations.Schema;

namespace AppointmentCalendar.Models
{
    public class Appointment
    {
        [Key]
        [DatabaseGenerated(DatabaseGeneratedOption.Identity)]
        public int Id { get; set; }
        public string Description { get; set; }
        public DateTime StartDate { get; set; }
        public DateTime EndDate { get; set; }
    }
}
Creating a Database context class
To create a Database context class, right-click Models and add one more class CalendarContext.cs:
using System;
using System.Collections.Generic;
using System.Linq;
using System.Web;
using System.Data.Entity;

namespace AppointmentCalendar.Models
{
 public class CalendarContext : DbContext
  {
   public CalendarContext() : base()
     {
       Database.SetInitializer(new CreateDatabaseIfNotExists<CalendarContext>());
     }
   public System.Data.Entity.DbSet<AppointmentCalendar.Models.Appointment> Appointments { get; set; }
  }
}
Add a connection string to the SQL server with the same name as the database context class to web.config:
<connectionStrings>
  <add name="CalendarContext"
       providerName="System.Data.SqlClient"
       connectionString="Data Source=.\SQLEXPRESS; Integrated Security=True; MultipleActiveResultSets=True"/>
Note, we've called the default database constructor:
public CalendarContext(): base()
If you want to use the database context with the database that already exists, you can pass the name of the connection string to the base constructor:
public CalendarContext(): base("SQLConnectionString")
And add a connection string with the same name to web.config. The model is ready.
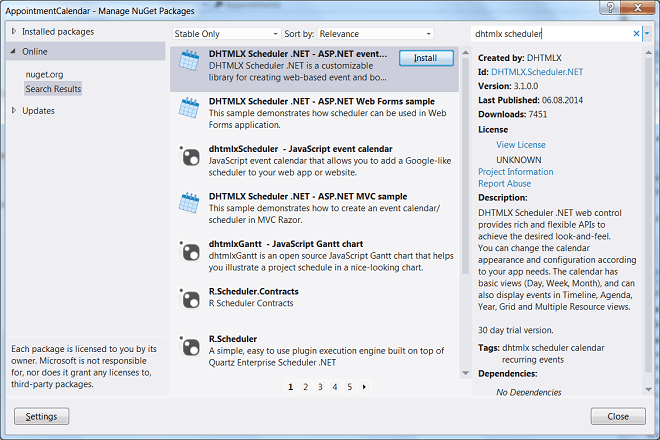
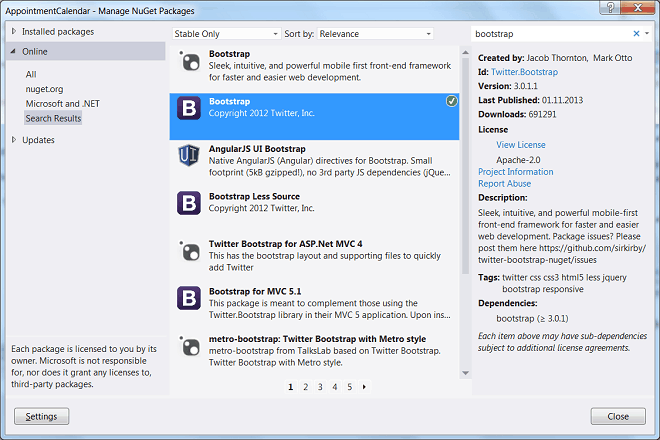
Step 3. Install Scheduler .NET from Nuget
Let’s install DHTMLX Scheduler .NET for ASP.NET from Nuget:
Step 4. Create a Controller
Create an empty controller, initialize scheduler in the index action and pass it to the view (the view will be added later on). Name it HomeController.cs:
using System;
using System.Collections.Generic;
using System.Linq;
using System.Web;
using System.Web.Mvc;

using DHTMLX.Scheduler;

namespace AppointmentCalendar.Controllers
{
    public class HomeController : Controller
    {
        //
        // GET: /Home/
        public ActionResult Index()
        {
            var scheduler = new DHXScheduler(this);
            scheduler.Skin = DHXScheduler.Skins.Flat;
            return View(scheduler);
        }
    }
}
Step 5. Create a View
In order to create a nice-looking layout without too much custom coding, we'll use a Twitter Bootstrap. Bootstrap can go as a part of MVC5 project template, but in our case we have to install it from NuGet:
To proceed, you need to create two folders in the Views folder: "Home" and "Shared".
The Shared folder should contain MVC5 Layout Page "_Layout.cshtml". So you need to add a new page with the following code:
<!DOCTYPE html>
<html>
<head>
    <meta charset="utf-8" />
    <meta name="viewport" content="width=device-width, initial-scale=1.0">
    <title>@ViewBag.Title - My ASP.NET Application</title>
    <link href="~/Content/Site.css" rel="stylesheet" type="text/css" />
    <link href="~/Content/bootstrap.min.css" rel="stylesheet" type="text/css" />

</head>
<body>
    <div class="navbar navbar-inverse navbar-fixed-top">
        <div class="container">
            <div class="navbar-header">
                @Html.ActionLink("Application name", "Index", "Home", null, new { @class = "navbar-brand" })
            </div>
            <div class="navbar-collapse collapse">
                <ul class="nav navbar-nav">
                </ul>
            </div>
        </div>
    </div>

    <div class="container body-content">
        @RenderBody()
        <hr />
        <footer>
            <p>© @DateTime.Now.Year - My ASP.NET Application</p>
        </footer>
    </div>

    <script src="~/Scripts/jquery-1.9.1.min.js"></script>
    <script src="~/Scripts/bootstrap.min.js"></script>
</body>
</html>
This is a basic page layout that can be seen in some default templates of MVC page. The page will contain the header with a navigation bar, which will collapse to a dropdown menu on small screens, the main content area and the footer section.
Right-click the Home folder and create MVC5 View Page with Layout. Name it Index and select a layout page "_Layout.cshtml". Add scheduler to *Views/Home/Index.cshtml*:
@{
    ViewBag.Title = "DHTMLX Scheduler .NET";
    Layout = "~/Views/Shared/_Layout.cshtml";
}

<h2>Appointment Calendar</h2>
<div class="scheduler_container">
    @Html.Raw(Model.Render())
</div>
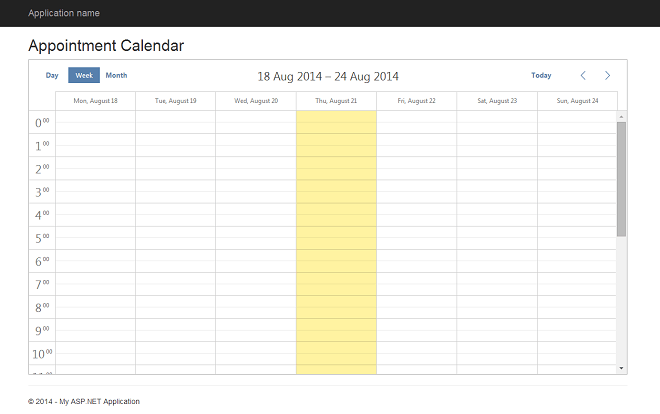
We've specified a very basic layout for a calendar page. All it will contain is a title and a block with the Scheduler.
Note that div where scheduler is rendered has the class 'scheduler_container'. We need to define some default styles for it.
Add a style sheet Content/Site.css and add the following CSS class:
body {
    padding-top: 50px;
    padding-bottom: 20px;
}

.scheduler_container{
    width:100%;
    height:600px;
    border:1px solid #aeaeae;
}
If you run the application now, you'll see the following result:
Step 6. Configure Appointment Calendar
Let's configure the calendar and attach data loading using our model.
First of all, update the model. We need to specify which properties of our model scheduler will use as the mandatory id, text and start/end dates. Go to Models/Appointment.cs and update it as follows:
using System;
using System.Collections.Generic;
using System.Linq;
using System.Web;
using System.Data.Entity;

using System.ComponentModel.DataAnnotations;
using System.ComponentModel.DataAnnotations.Schema;

using DHTMLX.Scheduler;

namespace AppointmentCalendar.Models
{
    public class Appointment
    {
        [Key]
        [DatabaseGenerated(DatabaseGeneratedOption.Identity)]
        [DHXJson(Alias="id")]
        public int Id { get; set; }

        [DHXJson(Alias = "text")]
        public string Description { get; set; }

        [DHXJson(Alias = "start_date")]
        public DateTime StartDate { get; set; }

        [DHXJson(Alias = "end_date")]
        public DateTime EndDate { get; set; }
    }
}
Then update the controller. Open Controllers/HomeController.cs and the following updates:
using System;
using System.Collections.Generic;
using System.Linq;
using System.Web;
using System.Web.Mvc;

using System.Data;
using System.Data.Entity;

using DHTMLX.Scheduler;
using DHTMLX.Scheduler.Data;
using DHTMLX.Common;

using AppointmentCalendar.Models;

namespace AppointmentCalendar.Controllers
{
    public class HomeController : Controller
    {
        private CalendarContext db = new CalendarContext();

        //
        // GET: /Home/
        public ActionResult Index()
        {
            var scheduler = new DHXScheduler(this);
            scheduler.Skin = DHXScheduler.Skins.Flat;

            scheduler.Config.first_hour = 6;
            scheduler.Config.last_hour = 20;

            scheduler.LoadData = true;
            scheduler.EnableDataprocessor = true;

            return View(scheduler);
        }

        public ContentResult Data()
        {
            var apps = db.Appointments.ToList();
            return new SchedulerAjaxData(apps);
        }

        public ActionResult Save(int? id, FormCollection actionValues)
        {
            var action = new DataAction(actionValues);

            try
            {
                var changedEvent = DHXEventsHelper.Bind<Appointment>(actionValues);
                switch (action.Type)
                {
                    case DataActionTypes.Insert:
                        db.Appointments.Add(changedEvent);
                        break;
                    case DataActionTypes.Delete:
                        db.Entry(changedEvent).State = EntityState.Deleted;
                        break;
                    default:// "update"
                        db.Entry(changedEvent).State = EntityState.Modified;
                        break;
                }
                db.SaveChanges();
                action.TargetId = changedEvent.Id;
            }
            catch (Exception a)
            {
                action.Type = DataActionTypes.Error;
            }

            return (new AjaxSaveResponse(action));
        }

        protected override void Dispose(bool disposing)
        {
            if (disposing)
            {
                db.Dispose();
            }
            base.Dispose(disposing);
        }
    }
}
In this code we've done following:
- updated configuration of the scheduler (Index action)
- specified the first and the last displayed hour
- configured the client side to send data and update requests to the server
By default, dhtmlxScheduler loads data from the Data action of the same controller and sends updates to the Save action.
We won't change this setting and name our actions after it:
public ActionResult Index()
{
    var scheduler = new DHXScheduler(this);
    scheduler.Skin = DHXScheduler.Skins.Flat;

    scheduler.Config.first_hour = 6;
    scheduler.Config.last_hour = 20;

    scheduler.LoadData = true;
    scheduler.EnableDataprocessor = true;

    return View(scheduler);
}
Data loading is pretty simple. The client side expects data to be loaded as a JSON string, as an array of event objects. We'll use a SchedulerAjaxData helper class in order to return our model in the format that can be recognized by the scheduler.
We could use the built-in JSON serializer or JSON.NET library instead of the scheduler helper. However, in this case we would have to manage property names (ones that we've specified in the attributes of the model) and the date format that is used to send data to the client manually:
public ContentResult Data()
{
   var apps = db.Appointments.ToList();
   return new SchedulerAjaxData(apps);
}
Saving also doesn't require much coding, but involves several helper classes that go with Scheduler .Net.
Probably, the main thing to note is that we create an instance of the model using DHXEventsHelper class, instead of using MVC Model Binder and specifying Appointment instance in the Action parameters. This is usually done because the client-side scheduler uses other names for mandatory properties of the model than those specified in your class (remember the DHXJson attributes in model class).
Surely, we could define a separate class for the client-side model or configure bindings with EF attributes, or implement a custom model binder, but the approach with the helper seems to be the simplest:
public ActionResult Save(int? id, FormCollection actionValues)
{
    var action = new DataAction(actionValues);

    try
    {
        var changedEvent = DHXEventsHelper.Bind<Appointment>(actionValues);
        switch (action.Type)
        {
            case DataActionTypes.Insert:
                db.Appointments.Add(changedEvent);
                break;
            case DataActionTypes.Delete:
                db.Entry(changedEvent).State = EntityState.Deleted;
                break;
            default:// "update"
                db.Entry(changedEvent).State = EntityState.Modified;
                break;
        }
        db.SaveChanges();
        action.TargetId = changedEvent.Id;
    }
    catch (Exception a)
    {
        action.Type = DataActionTypes.Error;
    }

    return (new AjaxSaveResponse(action));
}
Another thing to note: we store database context as a private property of the Controller class, and override the Dispose method in order to free database context resources as soon as ASP.NET finishes processing the request:
private CalendarContext db = new CalendarContext();
...
protected override void Dispose(bool disposing)
{
    if (disposing)
    {
        db.Dispose();
    }
    base.Dispose(disposing);
}
Step 7. Improve Your Calendar App
What we can do to improve this basic app is to enable dynamic loading mode of the calendar. It means that scheduler won't load all events at once, but will load only those that should be currently displayed.
It significantly decreases the loading time, which could be a pain, if your calendar has a large amount of events.
public ActionResult Index()
{
    var scheduler = new DHXScheduler(this);
    scheduler.Skin = DHXScheduler.Skins.Flat;

    scheduler.Config.first_hour = 6;
    scheduler.Config.last_hour = 20;

    scheduler.EnableDynamicLoading(SchedulerDataLoader.DynamicalLoadingMode.Month);

    scheduler.LoadData = true;
    scheduler.EnableDataprocessor = true;

    return View(scheduler);
}

public ContentResult Data(DateTime from, DateTime to)
{
    var apps = db.Appointments.Where(e => e.StartDate < to && e.EndDate >= from).ToList();
    return new SchedulerAjaxData(apps);
}
Done! After that you'll be able to use this project as a template for any application you'll need to build using dhtmlxScheduler .Net.
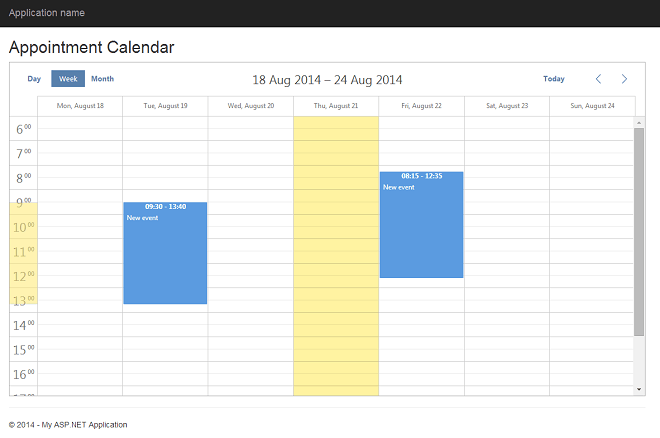
You can download a ready sample of appointment event calendar in ASP.NET MVC5 Razor right now: