- Scheduler .NET with NHibernate
- Scheduler .NET with Connector
- ASP.NET Event Calendar in Visual Basic
- ASP.NET Event Calendar in MVC3 Razor
- Scheduler in ASP.NET MVC3/MVC4 in 5 Steps
- Room Booking Calendar for ASP.NET
- Room Booking Calendar in MVC3 Razor
- Dynamic Loading and Airy Events in MVC3 Razor Room Booking Calendar
- Step 1. Updating File Structure
- Step 2. Customizing Events Appearance
- Step 3. Enabling Dynamic Loading
- Step 4. Adding Ajax Loader
- Car Rental Application in ASP.NET MVC3 Razor
- Task Manager in MVC5
- Hotel Room Booking Calendar in ASP.NET MVC5
- 7 Steps To Appointment Calendar Template in ASP.NET MVC5
Dynamic Loading and Airy Events in MVC3 Razor Room Booking Calendar
This tutorial gives instructions on how you can update a room booking calendar created with Scheduler.NET and MVC3 Razor: make the events transparent, enable dynamic loading and add other useful features. The full code to create a booking calendar is provided in the Room Booking Tutorial.
You can download the updated package right now, or follow the tutorial below:
Step 1. Updating File Structure
In the previous tutorial we've placed quite a lot of code on an .cshtml page, since it's kind of an intuitive way. However, it's not considered to be a good practice.
Firstly because it increases the size of your page. JS and CSS code put on the page is never get cached, so it's better to store a static code and styles in separate files to help browser open your page faster.
Secondly and mainly, it mixes up HTML markup and the logic of the application that could complicate maintaining of the app in the future. In this article we are going to fix it.
First of all, go to the layout page /Views/Shared/_Layout.cshtml and add a section into the 'head' tag, so view pages will be able to add < script > and < link > tags to the page head:
@RenderSection("head", false)When it's done, we need to put custom JS to a separate file.
To avoid defining many functions in a global namespace, we'll define a host object for all custom methods and data.
The full code looks like this (see /scripts.js in the package):
window.app = {

    //Add a helper that we’ll need later:
    //returns room name by id
    getRoom: function (id) {
        var rooms = app.rooms;
        for (var i in rooms) {
            if (rooms[i].key == id)
                return rooms[i].label;
        }
        return "";
    },


    //check if event belongs to the user and is it not started yet
    isEditable: function (event_id) {
        if (!app.checkLoggedIn())
            return false;
        var event_obj = scheduler.getEvent(event_id);
        if (!app.checkEventOwner(event_obj))
            return false;
        if (!event_obj)
            return false;
        return app.checkValidDate(event_obj.start_date);
    },

    checkEventOwner: function (event) {
        var user = app.current_user;
        if (event.user_id && event.user_id != user) {
            dhtmlx.message(app.othersEventMessage);
            return false;
        }
        return true;
    },

    //show message and return 'false' if provided date has passed
    checkValidDate: function (date) {
        if (date.valueOf() < new Date().valueOf()) {
            dhtmlx.message(app.pastEventMessage);
            return false;
        } else {
            return true;
        }
    },

    checkLoggedIn: function () {
        if (app.logged) {
            return true;
        } else {
            dhtmlx.message(app.needLoginMessage);
            return false;
        }
    },
    //error messages
    needLoginMessage: "You need to login first",
    pastEventMessage: "You can't add or edit events in the past",
    othersEventMessage: "You can't edit other's event;",

    initialize: function () {
        var rooms = app.rooms;
        scheduler.config.active_link_view = "rooms";
        //attach validators
        scheduler.attachEvent("onBeforeLightbox", app.isEditable);

        scheduler.attachEvent("onClick", app.isEditable);
        scheduler.attachEvent("onDblClick", app.isEditable);
        scheduler.attachEvent("onBeforeEventChanged", function (event) {
            return app.isEditable(event.id);
        });
        scheduler.attachEvent("onBeforeDrag", function (event_id, mode, native_event_object) {
            if (event_id)
                return app.isEditable(event_id);
            app.checkLoggedIn();
            var date = scheduler.getActionData(native_event_object).date;
            return app.checkValidDate(date);

        });
        scheduler.attachEvent("onEmptyClick", function (date) {
            app.checkLoggedIn();
            app.checkValidDate(date);
        });


        // text and css templates
        scheduler.templates.event_class = function (start, end, event) {
            var className = "";
            if (event.start_date.valueOf() < new Date().valueOf()) {
                className = "old_event";
            } else if (event.user_id) {
                className = "user_" + event.user_id;
            }
            return className;
        };

        scheduler.templates.event_text = scheduler.templates.agenda_text = scheduler.templates.event_bar_text = function (start, end, ev) {
            return app.getRoom(ev.room_id) + ' : ' + ev.text;
        }
        scheduler.templates.week_agenda_event_text = function (start, end, ev) {
            return scheduler.templates.event_date(ev.start_date) + ' ' + app.getRoom(ev.room_id) + ' : ' + ev.text;
        }


        //limit editing and creating of past events
        if (app.logged) {
            //set minimal available date and update it each minute
            scheduler.config.limit_start = new Date();
            setInterval(function () {
                scheduler.config.limit_start = new Date();
            }, 1000 * 60);

            scheduler.attachEvent("onLimitViolation", function () {
                dhtmlx.message(app.pastEventMessage);
            });

            scheduler.attachEvent("onEventCollision", function (ev, evs) {
                for (var i = 0; i < evs.length; i++) {
                    if (ev.user_id == evs[i].user_id) {
                        dhtmlx.message("There is already an event for <b>" + app.getRoom(ev.room_id) + "</b>");
                    }
                }
                return true;
            });
        }
    }
};
Now let's define a section that loads the script file to the page:
@section head{
  <script src="@Url.Content("~/Scripts/scripts.js")" ></script>
}
As you may remember, the code has used some data retrieved from the server side: the list of rooms, the id of the current user, and the boolean flag showing whether the user is logged in.
These values are only available on the cshtml page. We'll write them to the properties of our host object:
<script>
    // initialize variables loaded from the server side

    window.app.rooms = @Html.Raw(new JavaScriptSerializer().Serialize(Model.Rooms));
    window.app.current_user = "@Model.CurrentID";
    window.app.logged = @(this.Request.IsAuthenticated ? "true" : "false");
</script>
The name of the method that should be called after Scheduler initialization has changed. Therefore we need to update the Scheduler settings as follows:
scheduler.AfterInit = new List<string>() { "app.initialize();" };
Another thing that might be useful is to render links to JS/CSS sources of DHXScheduler separately from HTML markup and initialization code. That will allow us to add links to the page head and override styles without using '!important' directive.
Now the described section also includes links to JS and CSS files generated by Scheduler .NET:
@section head{
    <script src="@Url.Content("~/Scripts/scripts.js")" ></script>

    @Html.Raw(Model.Scheduler.GenerateLinks())
}
Finally, we need to replace Model.Scheduler.Render() with Model.Scheduler.GenerateHTML():
@Html.Raw(Model.Scheduler.GenerateHTML())
Here is the full code of Index.cshtml:
@section head{
<script src="@Url.Content("~/Scripts/scripts.js")" ></script>
@Html.Raw(Model.Scheduler.GenerateLinks())
}
@section headerContent{
@Html.Partial("_LogOnPartial")
}
<style> #main
{
height:565px;
}
@foreach (var userColor in Model.Colors)
{
<text>
.dhx_cal_event.user_@(userColor.Key) div,
.dhx_cal_event_line.user_@(userColor.Key),
.dhx_wa_ev_body.user_@(userColor.Key)
{
background-color: @(userColor.Value);
}
.dhx_cal_event_clear.user_@(userColor.Key){
color: @(userColor.Value);
border-color: @(userColor.Value);
}
</text>
}
@if (Model.CurrentID != null)
{
<text>
.active_user{
color:@Model.Colors[Model.CurrentID];
}
</text>
}
</style>
<script> //initialize variables loaded from server side, will introduce a global variable in order to store them:
window.app.rooms = @Html.Raw(new JavaScriptSerializer().Serialize(Model.Rooms));
window.app.current_user = "@Model.CurrentID";
window.app.logged = @(this.Request.IsAuthenticated ? "true" : "false");
</script>
@Html.Raw(Model.Scheduler.GenerateHTML())Step 2. Customizing Events Appearance
To make the calendar look more light and 'airy', we are going to configure the events a bit. In the previous tutorial we displayed events in different color for each user. Now we'll add opacity settings to the event boxes.
To make it more interactive and react on user actions visually, opacity will be changed to a solid color when user hovers mouse over an event box. Here is the related code:
/* opacity settings and transition speed */
.dhx_cal_event .dhx_body,
.dhx_cal_event_line,
.dhx_wa_ev_body{
    -webkit-transition: opacity 0.1s;
    transition: opacity 0.1s;
    opacity: 0.8;
}
.dhx_cal_event_line:hover,
.dhx_cal_event:hover .dhx_body,
.dhx_cal_event.selected .dhx_body,
.dhx_cal_event.dhx_cal_select_menu .dhx_body,
.dhx_cal_event_line:hover,
.dhx_wa_ev_body:hover{
    opacity: 1;
}

.dhx_cal_event div.dhx_footer{
    background-color: transparent !important;
}
The colors for each event are rendered to the page as it was done before:
@foreach (var userColor in Model.Colors)
{
    <text>
    .dhx_cal_event.user_@(userColor.Key) div,
    .dhx_cal_event_line.user_@(userColor.Key),
    .dhx_wa_ev_body.user_@(userColor.Key)
    {
        background-color: @(userColor.Value);
    }

    .dhx_cal_event_clear.user_@(userColor.Key){
        color: @(userColor.Value);
        border-color: @(userColor.Value);
    }
    </text>
}
CSS rules in Site.css:
/*override some of scheduler colors*/
/*week agenda event text color*/
.dhx_wa_ev_body{
    color: #efefef !important;
}

/* colors for 'past' events */
.dhx_cal_event.old_event div,
.dhx_cal_event_line.old_event,
.dhx_wa_ev_body.old_event
{
    background-color: #837F7F;
}
.dhx_cal_event_clear.old_event{
    color: #837F7F;
    border-color: #837F7F;
}

/*round border for single-day events in month view*/
.dhx_cal_event_clear
{
    padding: 2px 9px 2px 3px;
    border:1px solid #AEAEAE;
    border-radius:9px;
}


/* change event border color */
.dhx_cal_event .dhx_header,
.dhx_cal_event .dhx_footer,
.dhx_cal_event .dhx_body,
.dhx_cal_event .dhx_title {
    border-color: white !important;
}

/* opacity settings and transition speed */
.dhx_cal_event .dhx_body,
.dhx_cal_event_line,
.dhx_wa_ev_body{
    -webkit-transition: opacity 0.1s;
    transition: opacity 0.1s;
    opacity: 0.8;
}
.dhx_cal_event_line:hover,
.dhx_cal_event:hover .dhx_body,
.dhx_cal_event.selected .dhx_body,
.dhx_cal_event.dhx_cal_select_menu .dhx_body,
.dhx_cal_event_line:hover,
.dhx_wa_ev_body:hover{
    opacity: 1;
}

.dhx_cal_event div.dhx_footer{
    background-color: transparent !important;
}

/* slightly increase height of the header */
.dhx_cal_event .dhx_title{
    line-height: 12px;
}

/* ajax loading indicator */
.dhx_loading{
    background-image: url("ajax-loader.gif");
    width: 66px !important;
    height: 66px !important;
    margin-left: 30px;
    margin-top: -10px;
}

/* style for 'current time' indicator */
.dhx_now_time {
    border-bottom-style: solid;
    opacity: 0.5;
}

/* style for dates in calendar headers */
.dhx_cal_container  a
{
    color: #767676;
}
Step 3. Enabling Dynamic Loading
As the amount of calendar events grows, data loading might became too slow for comfortable usage of the application.
We should enable dynamic data load for sequential loading of big amounts of calendar data. In this regard, we need to update Controllers\HomeController.cs.
Firstly, update configuration of DHXScheduler, so it would request data in the 'dynamic' mode - requesting only the data required for the currently viewed time.
Secondly, update data handler in order to give data by parts (note that scheduler sends boundaries of displayed area, we need to load only events that happen within that period).
public ActionResult Index()
{
    var scheduler = new DHXScheduler(this);
    scheduler.Skin = DHXScheduler.Skins.Terrace;

    scheduler.EnableDynamicLoading(SchedulerDataLoader.DynamicalLoadingMode.Month);
The following updates allow us to load data in parts from the server side:
public ContentResult Data()
{
    var dateFrom = DateTime.ParseExact(this.Request.QueryString["from"], "yyyy-MM-dd", System.Globalization.CultureInfo.InvariantCulture);
    var dateTo = DateTime.ParseExact(this.Request.QueryString["to"], "yyyy-MM-dd", System.Globalization.CultureInfo.InvariantCulture);

    var events = new RoomBookingDataContext().Events.Where(e => e.start_date < dateTo && e.end_date > dateFrom).ToList();

    var data = new SchedulerAjaxData(events);

    return (ContentResult)data;<br>}
Step 4. Adding Ajax Loader
Since data loading may still take time, it might be a good idea to display some animation that will show user that loading is in progress. The Scheduler has a built-in option for such animation that can be enabled by the following config:
scheduler.Config.show_loading = true;
Scheduler initialization will look like this:
public ActionResult Index()
{
    var scheduler = new DHXScheduler(this);
    scheduler.Skin = DHXScheduler.Skins.Terrace;

    scheduler.EnableDynamicLoading(SchedulerDataLoader.DynamicalLoadingMode.Month);
    scheduler.Config.show_loading = true;
The default .gif is a bit old-fashioned, you can replace it with any custom .gif (see /Content/ajax-loader.gif in the sample package for the example). If you add a custom image, you need to specify the icon path and size in the CSS file:
/* ajax loading indicator */
.dhx_loading{
    background-image: url("ajax-loader.gif");
    width: 66px !important;
    height: 66px !important;
    margin-left: 30px;
    margin-top: -10px;
}
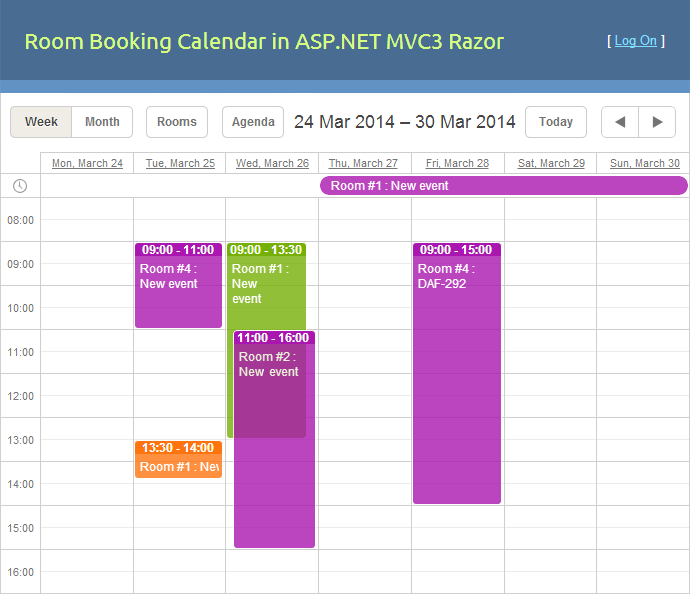
That's how the updated booking calendar looks like on our demo:

You can download the updated package of the room booking sample by subscribing to our periodic newsletter right now:
