- Scheduler .NET with NHibernate
- Scheduler .NET with Connector
- ASP.NET Event Calendar in Visual Basic
- ASP.NET Event Calendar in MVC3 Razor
- Scheduler in ASP.NET MVC3/MVC4 in 5 Steps
- Room Booking Calendar for ASP.NET
- Room Booking Calendar in MVC3 Razor
- Part 1. Setting Up a New Booking Calendar Project
- Part 2. Updating Controller and Views
- Part 3. Authentication and Basic Booking Settings
- Dynamic Loading and Airy Events in MVC3 Razor Room Booking Calendar
- Car Rental Application in ASP.NET MVC3 Razor
- Task Manager in MVC5
- Hotel Room Booking Calendar in ASP.NET MVC5
- 7 Steps To Appointment Calendar Template in ASP.NET MVC5
Room Booking Calendar in MVC3 Razor
This article describes the creation of an updated room booking calendar in ASP.NET MVC3 Razor. The previous Online Booking Calendar Tutorial for ASP.NET implemented in ASPX with a sample in the classic skin is still available for download.
This version of the demo got better look and feel (terrace skin, improved login form, highlighted user name) that caused substantial changes to the client-side code of the application.
Follow the instructions described below and you'll get such a colorful booking calendar (see the demo) in the shortest time.

You can skip reading the technical part of the tutorial and test the package on your device right now:
By entering your email, you agree to subscribe to Scheduler .NET periodic newsletter.
We have added dynamic loading and a possibility to change opacity settings and CSS transition speed for the calendar events. You can get these features and read the related tutorial by following this link.
The tutorial consists of 3 integral parts and includes necessary code snippets and useful screenshots.
Part 1. Setting Up a New Booking Calendar Project
Step 1. Creating MVC3 Web App
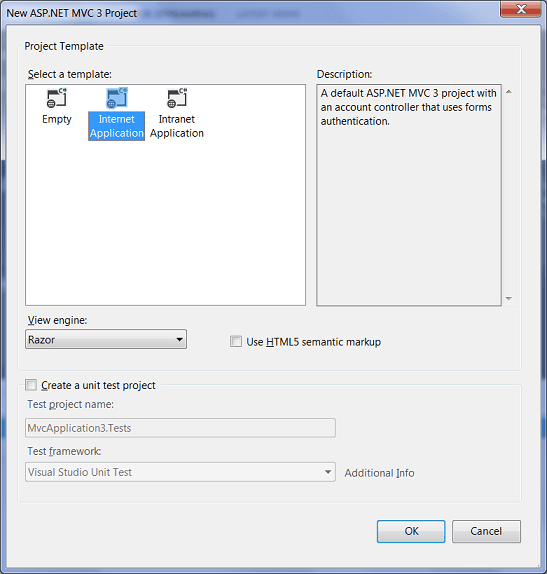
Let's create a new ASP.NET MVC3 Web Application in C# in Visual Studio 2012 or 2010. Name it "BookingCalendar". It should be an Internet application template by default.
Step 2. Setting Up a Database
The booking calendar will have user authentication, that's why we should add ASP.NET Membership for user credentials creation, validation and storage. Run ASP.NET SQL Server Registration Tool (C:\WINDOWS\Microsoft.NET\Framework\v.1-4\aspnet_regsql.exe). It will add the following tables to the database:
aspnet_Applications
aspnet_Membership
aspnet_SchemaVersions
aspnet_Users
Run this tool with the keys:
aspnet_regsql.exe -E -S <servername> -d <databasename> -A m
where < servername > is the name of your MS SQL Server instance, and < databasename > is the name of a database.
The Server Registration Tool creates a database (if no database was detected on the server) with necessary tables. We have to detach the database .mdf from the server and attach it to the project.
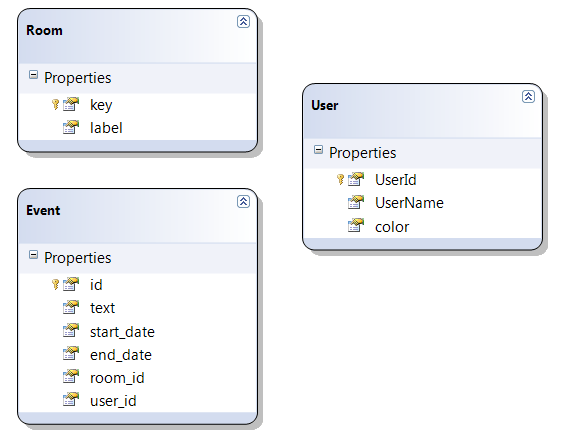
To store users credentials and rooms information, we need to create two more tables in Visual Studio – "Rooms" and "Events". The tables are created in the Server Explorer by adding new tables.
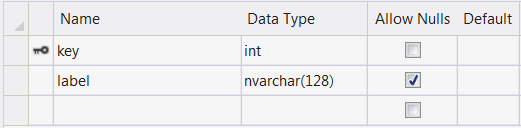
The "Rooms" table should contain room ID [key] and room name [label]:
The "Events" table includes room_id and user_id to indicate the ID of rooms and users correspondingly.
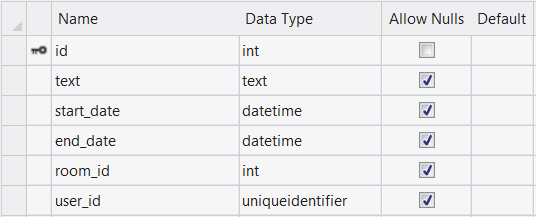
Note that the primary key and the identity column should be enabled for [key] and id.
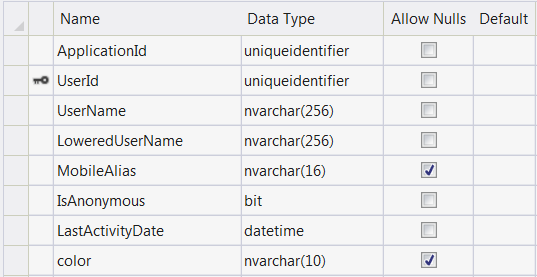
Open the "aspnet_Users" table and add the color property to set the color of calendar events for each user id:
All the tables are ready. Let's proceed with Model creation.
Step 3. Creating a Data Model
To create a data model, follow the steps below:
- Right-click on the Models folder in the Solution Explorer -> Add Item. Select LINQ to SQL Classes and name it "RoomBooking.dbml".
- Go to the Solution Explorer and right-click on the Models to add a new item.
- Choose LINQ to SQL Classes and name it "Calendar.dbml".
- Now drag the tables "Events", "aspnet_User" and "Rooms" to the Model designer. Note that aspnet_User model needs only three properties: UserId, UserName and color. The rest should be removed.
- Rename "aspnet_User" into "User".
That's how the database model should look like:
To allow ASP.NET Membership to use our database instead of the default one, update the Web.config in the following way:
<membership defaultProvider="CustomMembershipProvider">
    <providers>
     <clear/>
      <add name="CustomMembershipProvider" type="System.Web.Security.SqlMembershipProvider"
        connectionStringName="bookingConnectionString"
        enablePasswordRetrieval="false"
        enablePasswordReset="true"
        requiresQuestionAndAnswer="false"
        requiresUniqueEmail="false"
        maxInvalidPasswordAttempts="5"
        minRequiredPasswordLength="1"
        minRequiredNonalphanumericCharacters="0"
        passwordAttemptWindow="10"
        applicationName="/" />
 </providers>
</membership>
Step 4. Installing Scheduler .NET MVC3 Package via NuGet
The initialization process is simplified thanks to the uploaded Scheduler .NET packages to NuGet.
Right-click on your project folder and select Manage NuGet Packages. The search by the word "dhtmlx" will display the available packages. You should choose "DHTMLX.Scheduler.MVC3.Sample" from the list. It will be installed together with DHMTLX Scheduler .NET library.
Another way to install Scheduler .NET package is to run the following command in the Package Manager Console:
PM> Install-Package DHTMLX.Scheduler.MVC3.Sample
If you check the project folder in the Solution Explorer, you'll see the updates: a controller, a calendar view page and a sample model. The installed controller and view need updating, the sample model file can be removed.
In fact, it would be enough to install only DHTMLX Scheduler .NET library without MVC3 Sample but the sample contains some useful code snippets that we'll use later to save time on typing.
Part 2. Updating Controller and Views
Step 1. Updating the Controller
As far as we don't need HomeController.cs and \Views\Home, they can be deleted. We'll have to make amendments to the controller and the view of the Scheduler .NET sample.
At first, update CalendarController.cs code as it is shown below:
using System;
using System.Collections.Generic;
using System.Linq;
using System.Web;
using System.Web.Mvc;

using DHTMLX.Scheduler;
using DHTMLX.Common;
using DHTMLX.Scheduler.Data;
using BookingCalendar.Models;

namespace BookingCalendar.Controllers
{
   public class CalendarController : Controller
   {
       public ActionResult Index()
       {
           var scheduler = new DHXScheduler(this);
           scheduler.Skin = DHXScheduler.Skins.Terrace;
           scheduler.Config.multi_day = true; // render multi-day events
           scheduler.LoadData = true;
           scheduler.EnableDataprocessor = true;

           return View(scheduler);
       }

       public ContentResult Data()
       {
           var data = new SchedulerAjaxData(
               new RoomBookingDataContext().Events
           );

           return (ContentResult)data;
       }

       public ContentResult Save(int? id, FormCollection actionValues)
       {
           var action = new DataAction(actionValues);
           var data = new RoomBookingDataContext();

           try
           {
               var changedEvent = DHXEventsHelper.Bind<Event>(actionValues);
               switch (action.Type)
               {
                   case DataActionTypes.Insert:
                       data.Events.InsertOnSubmit(changedEvent);
                       break;
                   case DataActionTypes.Delete:
                       changedEvent = data.Events.SingleOrDefault(ev => ev.id == action.SourceId);
                       data.Events.DeleteOnSubmit(changedEvent);
                       break;
                   default:// "update"
                       var eventToUpdate = data.Events.SingleOrDefault(ev => ev.id == action.SourceId);
                       DHXEventsHelper.Update(eventToUpdate, changedEvent, new List<string>() { "id" });
                       break;
               }
               data.SubmitChanges();
               action.TargetId = changedEvent.id;
           }
           catch
           {
               action.Type = DataActionTypes.Error;
           }
           return new AjaxSaveResponse(action);
       }
   }
}
Update AccountController.cs by changing redirects from RedirectToAction("Index", "Home") to RedirectToAction("Index", "Calendar").
Once you've updated the controllers, change the default route from "Home" to "Calendar" in Global.aspx.
Step 2. Updating the View
To add an appropriate appearance to the calendar page, open View/Shared/_Layout.cshtml and update the view:
<!DOCTYPE html>
<html>
<head>
   <title>@ViewBag.Title</title>
   <link href="@Url.Content("~/Content/Site.css")" rel="stylesheet" type="text/css" />
</head>
<body>
<div class="head_line">
    <div class="head_inner">Booking Calendar in ASP.NET
        @RenderSection("headerContent", false)
    </div>
</div>
<div class="page">
    <div id="main">
        @RenderBody()
    </div>
</div>
</body>
</html>
To add a log on section to the calendar update Calendar/Index.cshtml:
@{
   ViewBag.Title = "Booking Calendar";
}

@section headerContent{
   @Html.Partial("_LogOnPartial")
}

<div id="calendar">
@Html.Raw(Model.Render())
</div>
Now we need to change the Log On button in Shared_LogOnPartial.cshtml:
<span style="float:right">
@if(Request.IsAuthenticated) {
    <text>Welcome <b class="active_user">@Context.User.Identity.Name</b>!
    [ @Html.ActionLink("Log Off", "LogOff", "Account") ]</text>
}
else {
    @ :[ @Html.ActionLink("Log On", "LogOn", "Account") ]
}
</span>
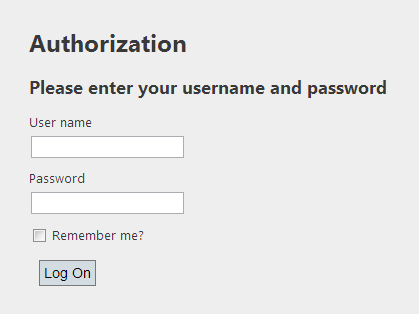
Update the login page code in Account\LogOn.cshtml:
@{
    ViewBag.Title = "Log On";
}
@model BookingCalendar.Models.LogOnModel

@Html.ValidationSummary(true, "Login was unsuccessful. Please correct the errors and try again.")

<div id="header">
    <div id="title">
        <h1>Authorization</h1>
    </div>
</div>

@using (Html.BeginForm()) {
    <div>
        <div>
            <h2>Please enter your username and password</h2>
            <div >

                <div class="editor-label">
                    @Html.LabelFor(m => m.UserName)
                </div>
                <div class="editor-field">
                    @Html.TextBoxFor(m => m.UserName)
                    @Html.ValidationMessageFor(m => m.UserName)
                </div>

                <div class="editor-label">
                    @Html.LabelFor(m => m.Password)
                </div>
                <div class="editor-field">
                    @Html.PasswordFor(m => m.Password)
                    @Html.ValidationMessageFor(m => m.Password)
                </div>

                <div class="editor-label">
                    @Html.CheckBoxFor(m => m.RememberMe)
                    @Html.LabelFor(m => m.RememberMe)
                </div>

                <p style="clear:both">
                    <input type="submit" id="login" value="Log On" />
                </p>
            </div>
        </div>
        <div style="clear:both;"></div>
    </div>
}

<style>    .page
    {
        width:360px;
        background-color:#efeeef;
        padding:10px 30px;
        font-family:"Segoe UI", Verdana, Helvetice, Sans-Serif;
        padding-bottom:15px;
    }
</style>
Here is the authorization form we get:
The final calendar page appearance is defined in CSS. Update Site.css as follows:
html, body
{
    margin:0;
    padding:0;
    height:100%;
    overflow:auto;
}

body
{
    background: #5c87b2;
    background-image:url(./bg.png);
    font-size: .75em;
    font-family: "Segoe UI", Verdana, Helvetice, Sans-Serif;
    margin: 0;
    padding: 0;
    color: #393939;
}

.page
{
    width:1020px;
    margin:0 auto;
}

#calendar
{
    height:600px;
    margin-top:20px;
}

a:link, a:visited
{
    color: #ffffff;
    text-decoration: underline;
}
a:hover
{
    text-decoration: none;
}


/*header line*/
.head_line
{
    background-color:#2e3b49;
    height: 15px;
    padding: 8px 0;
}
.head_inner
{
    margin:0 auto;
    width: 1020px;

}
.head_inner, .head_inner
{
    color: #efefef;
}


/* additional styles for login page*/


#logindisplay
{
    font-size:1.1em;
    display:block;
    text-align:right;
    margin:10px;
    color:White;
}

#logindisplay a:link, #logindisplay a:visited
{
    color: white;
    text-decoration: underline;
}

#logindisplay a:hover
{
    color: white;
    text-decoration: none;
}


.editor-label
{
    margin-top:10px;
    line-height:120%;
    height:20px;
    cursor:pointer;
}
.editor-label input
{
    border: 1px solid #e2e2e2;
}
.editor-label label
{
    font-size:13px;
}
.editor-label input, .editor-label label{
    vertical-align:middle;
}

#login
{
    background-color:#d3dce0;
    border:1px solid #787878;
    cursor:pointer;
    padding:4px;
    margin-left:10px;
    font-size:1.2em;
}

/*override some of scheduler colors*/
/*week agenda and month event text color*/
.dhx_wa_ev_body, .dhx_cal_event_clear
{
    color:#efefef !important;
}

.dhx_cal_event .dhx_header,
.dhx_cal_event .dhx_footer,
.dhx_cal_event .dhx_body,
.dhx_cal_event .dhx_title
{
    border-color:white !important;
}
Now the application can be rendered in your browser. It will look like this:
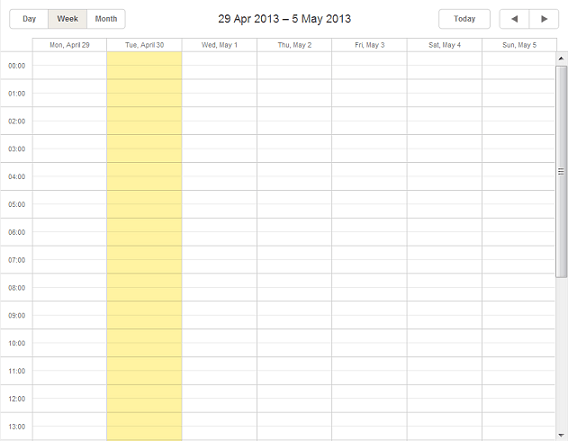
When you build the calendar in Visual Studio 2010, you can encounter an error:
Error 1 The type 'System.Web.Mvc.ModelClientValidationRule' exists in both 'c:\Program Files (x86)\Microsoft ASP.NET\ASP.NET MVC 3\Assemblies\System.Web.Mvc.dll' and 'c:\Program Files (x86)\Microsoft ASP.NET\ASP.NET Web Pages\v2.0\Assemblies\System.Web.WebPages.dll' C:\studyCode\MVCDemo-Part12\MVCDemo-Part12\MVCDemo\Attributes\Validation\EqualAttribute.cs 54 28 MVCDemo
Here is a solution:
1 . Add a new entry with the key webPages:Version and the value 1.0.0.0. in the Web.config file:
<appSettings>
    <add key="webpages:Version" value="1.0.0.0"/>
    <add key="ClientValidationEnabled" value="true"/>
    <add key="UnobtrusiveJavaScriptEnabled" value="true"/>
</appSettings>
2 . Right-click on the project name’ in the Solution Explorer and select Unload Project.
3 . Replace the following assembly references
<Reference Include="System.Web.WebPages"/>
<Reference Include="System.Web.Helpers" />
with
<Reference Include="System.Web.WebPages, Version=1.0.0.0,
Culture=neutral, PublicKeyToken=31bf3856ad364e35, processorArchitecture=MSIL "/>
<Reference Include="System.Web.Helpers, Version=1.0.0.0,
Culture=neutral, PublicKeyToken=31bf3856ad364e35, processorArchitecture=MSIL "/>
4 . Save your changes and close the project (.csproj) file. Then right-click on the project and select Reload.
Part 3. Authentication and Basic Booking Settings
1 . Create one more model for your calendar events.
Right-click on the Model->Class and add CalendarModel.cs with the following code:
using System;
using System.Collections.Generic;
using System.Linq;
using System.Web;
using DHTMLX.Scheduler;


namespace BookingCalendar.Models
{
   public class CalendarModel
   {
       public IEnumerable<Room> Rooms { get; set; }
       public Dictionary<string, string> Colors { get; set; }
       public string CurrentID { get; set; }
       public DHXScheduler Scheduler { get; set; }
   }
}
2 . Let's customize Scheduler .NET general settings. Go back to CalendarController.cs and follow the instructions given below:
a) Connect the extension that disallows adding several events at a time:
scheduler.Extensions.Add(SchedulerExtensions.Extension.Collision);
b) Connect the extension that disallows adding events in the past:
scheduler.Extensions.Add(SchedulerExtensions.Extension.Limit);
c) Customize other calendar settings:
scheduler.Config.first_hour = 8;
scheduler.Config.last_hour = 19;
scheduler.XY.scroll_width = 0;
scheduler.Config.time_step = 30; // minimum event length
scheduler.Config.multi_day = true;
scheduler.Config.limit_time_select = true;

scheduler.Config.cascade_event_display = true;

scheduler.AfterInit = new List<string>() { "attachRules();" };// The required client-side handlers have to be added after Scheduler initialization but before events load.

scheduler.LoadData = true;


if (Request.IsAuthenticated)
   scheduler.EnableDataprocessor = true;
else
   scheduler.Config.isReadonly = true;
d) Customize views by adding units and WeekAgendaView. DayView should be removed.
/*add views*/
var context = new RoomBookingDataContext();

scheduler.Views.Items.RemoveAt(2);//remove DayView

var rooms = context.Rooms.ToList();
units.Label = "Rooms";
units.AddOptions(rooms);
scheduler.Views.Add(units);
scheduler.Views.Add(new WeekAgendaView());
Add a namespace:
using DHTMLX.Scheduler.Controls;
e) Add a control that allows users to choose a room in the lightbox:
var select = new LightboxSelect("room_id", "Room");
select.AddOptions(rooms);
scheduler.Lightbox.AddDefaults();
scheduler.Lightbox.Items.Insert(1, select);
f) Update settings for authorized users:
if (Request.IsAuthenticated)
{
   var user = context.Users.SingleOrDefault(u => u.UserId == (Guid)Membership.GetUser().ProviderUserKey);
   scheduler.InitialValues.Add("room_id", rooms.First().key);
   scheduler.InitialValues.Add("user_id", user.UserId);
}
Add another namespace:
using System.Web.Security;
g) Information about rooms and event colors should be rendered to the client side:
var userColors = (from us in context.Users select new { id = us.UserId.ToString(), color = us.color })
   .ToDictionary(t => t.id.ToLower(), t => t.color);

string currentID = null;
if (this.Request.IsAuthenticated)
   currentID = Membership.GetUser().ProviderUserKey.ToString();

return View(new CalendarModel() {
  Rooms = rooms,
  Colors = userColors,
  CurrentID = currentID,
  Scheduler = scheduler }
);
Here is the controller full code:
using System;
using System.Collections.Generic;
using System.Linq;
using System.Web;
using System.Web.Mvc;


using System.Web.Security;


using DHTMLX.Scheduler;
using DHTMLX.Common;
using DHTMLX.Scheduler.Controls;
using DHTMLX.Scheduler.Data;
using BookingCalendar.Models;


using System.Web.Script.Serialization;

namespace BookingCalendar.Controllers
{
   public class HomeController : Controller
   {
       public ActionResult Index()
       {
           var scheduler = new DHXScheduler(this);
           scheduler.Skin = DHXScheduler.Skins.Terrace;

           /*enable extensions*/
           scheduler.Extensions.Add(SchedulerExtensions.Extension.Collision);
           scheduler.Extensions.Add(SchedulerExtensions.Extension.Limit);

           scheduler.Config.first_hour = 8;
           scheduler.Config.last_hour = 19;
           scheduler.XY.scroll_width = 0;
           scheduler.Config.time_step = 30; // minimum event length
           scheduler.Config.multi_day = true;
           scheduler.Config.limit_time_select = true;

           scheduler.Config.cascade_event_display = true;

           scheduler.AfterInit = new List<string>() { "attachRules();" }; // required client-side handlers should be added after Scheduler initialization but before events load

           scheduler.LoadData = true;


           if (Request.IsAuthenticated)
               scheduler.EnableDataprocessor = true;
           else
               scheduler.Config.isReadonly = true;


           /*add views*/
           var context = new RoomBookingDataContext();


           scheduler.Views.Items.RemoveAt(2);//remove DayView


           var units = new UnitsView("rooms", "room_id");

           units.Label = "Rooms";
           var rooms = context.Rooms.ToList();
           units.AddOptions(rooms);
           scheduler.Views.Add(units);
           scheduler.Views.Add(new WeekAgendaView());

           /*Let's set a lightbox by adding a control that allows users to choose a room:*/

           var select = new LightboxSelect("room_id", "Room");
           select.AddOptions(rooms);
           scheduler.Lightbox.AddDefaults();
           scheduler.Lightbox.Items.Insert(1, select);


           /*Customize settings for authorized users:*/

           if (Request.IsAuthenticated)
           {
               var user = context.Users.SingleOrDefault(u => u.UserId == (Guid)Membership.GetUser().ProviderUserKey);
               scheduler.InitialValues.Add("room_id", rooms.First().key);
               scheduler.InitialValues.Add("user_id", user.UserId);
           }

           var userColors = (from us in context.Users select new { id = us.UserId.ToString(), color = us.color })
                   .ToDictionary(t => t.id.ToLower(), t => t.color);


           string currentID = null;
           if (this.Request.IsAuthenticated)
               currentID = Membership.GetUser().ProviderUserKey.ToString();

           return View(new CalendarModel() {
               Rooms = rooms,
               Colors = userColors,
               CurrentID = currentID,
               Scheduler = scheduler }
               );
       }

       public ContentResult Data()
       {
           var data = new SchedulerAjaxData(
               new RoomBookingDataContext().Events
           );

           return (ContentResult)data;
       }


       public ContentResult Save(int? id, FormCollection actionValues)
       {
           var action = new DataAction(actionValues);
           var data = new RoomBookingDataContext();

           try
           {
               var changedEvent = DHXEventsHelper.Bind<Event>(actionValues);
               if (Request.IsAuthenticated && changedEvent.user_id == (Guid)Membership.GetUser().ProviderUserKey && changedEvent.start_date > DateTime.Now)
               {
                   switch (action.Type)
                   {
                       case DataActionTypes.Insert:
                           data.Events.InsertOnSubmit(changedEvent);
                           break;
                       case DataActionTypes.Delete:
                           changedEvent = data.Events.SingleOrDefault(ev => ev.id == action.SourceId);
                           data.Events.DeleteOnSubmit(changedEvent);
                           break;
                       default:// "update"
                           var eventToUpdate = data.Events.SingleOrDefault(ev => ev.id == action.SourceId);
                           DHXEventsHelper.Update(eventToUpdate, changedEvent, new List<string>() { "id" });
                           break;
                   }
                   data.SubmitChanges();
                   action.TargetId = changedEvent.id;
               }
               else
               {
                   action.Type = DataActionTypes.Error;
               }
           }
           catch
           {
               action.Type = DataActionTypes.Error;
           }
           return new AjaxSaveResponse(action);
       }
   }
}
3 . In this version of a booking calendar we'll define colors for users and events (including past events) by assigning corresponding CSS classes on the client side. To render the related CSS classes, add the following < style > tag to Index.cshtml:
<style>
#main
{
   height:510px;
}

@foreach (var userColor in Model.Colors)
{
   <text>
   .dhx_cal_event.user_@(userColor.Key) div,
   .dhx_cal_event_line.user_@(userColor.Key),
   .dhx_cal_event_clear.user_@(userColor.Key),
   .dhx_wa_ev_body.user_@(userColor.Key)
   {
      background-color: @(userColor.Value) !important;

 }
   </text>
}


.dhx_cal_event.old_event div,
.dhx_cal_event_line.old_event,
.dhx_cal_event_clear.old_event,
.dhx_wa_ev_body.old_event
{
   background-color: #B9B9B9 !important;
}

@if(Model.CurrentID != null){
   <text>
   .active_user{
      color:@Model.Colors[Model.CurrentID];
  }
   </text>
}

</style>
Learn more about custom event colors.
4 . Let's use a script to run the client configuration of Scheduler .NET. Add the function attachRules() that has been rendered to scheduler.BeforeInit():
<script>
   function attachRules() {
       var rooms = @Html.Raw(new JavaScriptSerializer().Serialize(Model.Rooms));
       // add a helper that we'll need later:
       // returns room name by id
       function getRoom(id) {
           for (var i in rooms) {
               if (rooms[i].key == id)
               return rooms[i].label;
           }
           return "";
       }
5 . We've used JavaScriptSerializer to convert the room list to JSON. To use serializer on a CSHTML page add the following namespace:
@using System.Web.Script.Serialization
6 . User validation prevents users from editing/creating events in the following cases:
a) user is not logged in; b) user tries to create/edit event in the past; c) user tries to edit an event created by another user;
7 . Let's add the corresponding error alerts:
var needLoginMessage = "You need to login first";
var pastEventMessage = "You can't add or edit events in the past";
var othersEventMessage = "You can't edit other's event;"
8 . Add the following logics to identify whether an event belongs to a certain user or it is not created yet:
var isEditable = function(event_id){
   if(!checkLoggedIn())
      return false;
   var event_obj = scheduler.getEvent(event_id);
   if(!checkEventOwner(event_obj ))
      return false;
   if(!event_obj)
      return false;
   return checkValidDate(event_obj.start_date);
};


function checkEventOwner(event){

   if(event.user_id && event.user_id != "@Model.CurrentID"){
      dhtmlx.message(othersEventMessage);
      return false;
   }
   return true;
}
9 . Trigger a message and return 'false' provided the date has passed:
function checkValidDate(date){
     if(date.valueOf() < new Date().valueOf()){
        dhtmlx.message(pastEventMessage);
      return false;
    }else{
        return true;
     }
}
10 . Trigger a message and return "false" if user is not authenticated:
function checkLoggedIn(){
    @if(!this.Request.IsAuthenticated){
        <text>
        dhtmlx.message(needLoginMessage);
        return false;
        </text>
    }else{
        <text>
        return true;
        </text>
    }
}
11 . Attach validators to check editability of events:
scheduler.attachEvent("onBeforeLightbox", isEditable);

scheduler.attachEvent("onClick", isEditable);
scheduler.attachEvent("onDblClick",isEditable);
scheduler.attachEvent("onBeforeEventChanged", function(event){
    return isEditable(event.id);
});
scheduler.attachEvent("onBeforeDrag", function (event_id, mode, native_event_object){
    if(event_id)
        return isEditable(event_id);
    checkLoggedIn();
    var date = scheduler.getActionData(native_event_object).date;
    return checkValidDate(date);
});
scheduler.attachEvent("onEmptyClick", function (date){
    checkLoggedIn();
    checkValidDate(date);
});
12 . Set minimal available date and update it each minute:
scheduler.config.limit_start = new Date();
  setInterval(function(){
    scheduler.config.limit_start = new Date();
 }, 1000*60);
13 . Add a message for not logged in users:
@if(this.Request.IsAuthenticated){
     <text>
       //just for a demo purposes
      scheduler.attachEvent("onLimitViolation", function(){
         dhtmlx.message(pastEventMessage);
        });
    </text>
}
14 . Redefine templates for event CSS classes (to set colors for loaded events) and for the texts displayed in event boxes:
scheduler.templates.event_class = function(start, end, event){
      var className = "";
      if(event.start_date.valueOf()  < new Date().valueOf()){
          className = "old_event";
      }else if(event.user_id){
          className = "user_" + event.user_id;
      }
      return className;
  };
15 . Update event templates:
scheduler.templates.event_text = scheduler.templates.agenda_text = scheduler.templates.event_bar_text = function(start,end,ev){
    return getRoom(ev.room_id)+' : ' + ev.text;
}
scheduler.templates.week_agenda_event_text = function(start,end,ev){
    return scheduler.templates.event_date(ev.start_date) + ' ' +getRoom(ev.room_id)+' : ' + ev.text;
}
Here is the full code of Index.cshtml:
@{
ViewBag.Title = "Booking Calendar";
}
@using System.Web.Script.Serialization
@section headerContent{
@Html.Partial("_LogOnPartial")
}
<style> #main
{
height:510px;
}
@foreach (var userColor in Model.Colors)
{
<text>
.dhx_cal_event.user_@(userColor.Key) div,
.dhx_cal_event_line.user_@(userColor.Key),
.dhx_cal_event_clear.user_@(userColor.Key),
.dhx_wa_ev_body.user_@(userColor.Key)
{
background-color: @(userColor.Value) !important;
}
</text>
}
.dhx_cal_event.old_event div,
.dhx_cal_event_line.old_event,
.dhx_cal_event_clear.old_event,
.dhx_wa_ev_body.old_event
{
background-color: #B9B9B9 !important;
}
@if(Model.CurrentID != null){
<text>
.active_user{
color:@Model.Colors[Model.CurrentID];
}
</text>
}
</style>
<script>function attachRules() {
var rooms = @Html.Raw(new JavaScriptSerializer().Serialize(Model.Rooms));
//Add a helper that we’ll need later:
//returns room name by id
function getRoom(id) {
for (var i in rooms) {
if (rooms[i].key == id)
return rooms[i].label;
}
return "";
}
var needLoginMessage = "You need to login first";
var pastEventMessage = "You can't add or edit events in the past";
var othersEventMessage = "You can't edit other's event;"
var isEditable = function(event_id){
if(!checkLoggedIn())
return false;
var event_obj = scheduler.getEvent(event_id);
if(!checkEventOwner(event_obj ))
return false;
if(!event_obj)
return false;
return checkValidDate(event_obj.start_date);
};
function checkEventOwner(event){
if(event.user_id && event.user_id != "@Model.CurrentID"){
dhtmlx.message(othersEventMessage);
return false;
}
return true;
}
function checkValidDate(date){
if(date.valueOf() < new Date().valueOf()){
dhtmlx.message(pastEventMessage);
return false;
}else{
return true;
}
}
function checkLoggedIn(){
@if(!this.Request.IsAuthenticated){
<text>
dhtmlx.message(needLoginMessage);
return false;
</text>
}else{
<text>
return true;
</text>
}
}
scheduler.attachEvent("onBeforeLightbox", isEditable);
scheduler.attachEvent("onClick", isEditable);
scheduler.attachEvent("onDblClick",isEditable);
scheduler.attachEvent("onBeforeEventChanged", function(event){
return isEditable(event.id);
});
scheduler.attachEvent("onBeforeDrag", function (event_id, mode, native_event_object){
if(event_id)
return isEditable(event_id);
checkLoggedIn();
var date = scheduler.getActionData(native_event_object).date;
return checkValidDate(date);
});
scheduler.attachEvent("onEmptyClick", function (date){
checkLoggedIn();
checkValidDate(date);
});
scheduler.config.limit_start = new Date();
setInterval(function(){
scheduler.config.limit_start = new Date();
}, 1000*60);
@if(this.Request.IsAuthenticated){
<text>
//just for a demo purposes
scheduler.attachEvent("onLimitViolation", function(){
dhtmlx.message(pastEventMessage);
});
</text>
}
scheduler.templates.event_class = function(start, end, event){
var className = "";
if(event.start_date.valueOf() < new Date().valueOf()){
className = "old_event";
}else if(event.user_id){
className = "user_" + event.user_id;
}
return className;
};
scheduler.templates.event_text = scheduler.templates.agenda_text = scheduler.templates.event_bar_text = function(start,end,ev){
return getRoom(ev.room_id)+' : ' + ev.text;
}
scheduler.templates.week_agenda_event_text = function(start,end,ev){
return scheduler.templates.event_date(ev.start_date) + ' ' +getRoom(ev.room_id)+' : ' + ev.text;
}
}
</script>
<div id="calendar">
@Html.Raw(Model.Scheduler.Render())
</div>FYI:
Rooms can be added via Server Explorer:
INSERT INTO Rooms (label) VALUES ('Room #1'), ('Room #2'), ('Room #3'), ('Room #4')
You can add more users to the booking calendars by means of the Web Site Administration Tool in ASP.NET configurations.
Note that this tool can't assign colors to users. You can do it by using SQL query or add a possibility to assign colors.
You can create users with the names guest1, guest2, guest3 and assign a color to each users by the following query:
UPDATE  aspnet_Users SET color='#fe7510' WHERE UserName='guest1';
UPDATE  aspnet_Users SET color='#aa17b0' WHERE UserName='guest2';
UPDATE  aspnet_Users SET color='#76b007' WHERE UserName='guest3';
When you are done with this tutorial, you can get an attractive room booking calendar with agenda, room and basic week and month views like in our live demo. You can get a ready room booking sample by subscribing to our periodic newsletter right now:
We have added dynamic loading and a possibility to change opacity settings and CSS transition speed for the calendar events. You can learn more about these updates in the following tutorial.