Lightbox
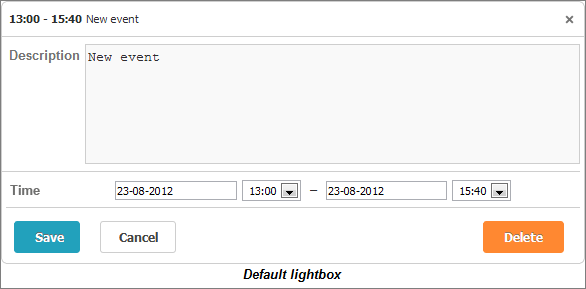
Lightbox is an edit form used to alter the event's details. The default lightbox is presented in the image below.

In this chapter you'll learn how to:
How to Add a Control to the Lightbox

Generally, to add a control to the lightbox you should use the Add() method:
scheduler.Lightbox.Add(LightboxItem object);
The Controls namespace contains controls available for adding.
The main members of the namespace are:
- LightboxMiniCalendar - a date input with popup calendar;
- LightboxCheckbox - a checkbox;
- LightboxMultiselect - a multi-select list box;
- LightboxSelectOption - a select option of the list box.
- LightboxRadio - a set of radio buttons;
- LightboxSelectOption - a single radio button.
- LightboxSelect - a dropdown list;
- LightboxSelectOption - a select option of the dropdown list.
- LightboxText - a text input;
- LightboxTime - a control area containing 2 date inputs for setting start and end times;
- LightboxReccuringBlock - a control area used to set values for recurring events.
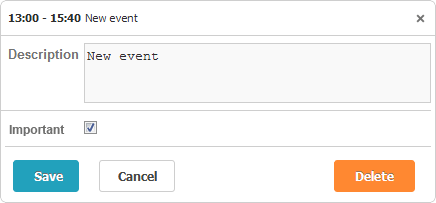
var check = new LightboxCheckbox("highlighting", "Important");
check.MapTo = "textColor";
check.CheckedValue = "red";

scheduler.Lightbox.Add(check);
scheduler.Lightbox.Add(new LightboxText("text", "Description"));
By default, a scheduler contains 2 controls:
- time - (LightboxTime) the start (when an event is scheduled to begin) and end (when an event is scheduler to be completed) times.
- text - (LightboxText) the text of an event.
Beware, as soon as you add some custom control, the default controls will be removed. To add some new control and hold the default ones, add the following code to the action:
scheduler.Lightbox.AddDefaults();
Dropdown Controls
Here is a common technique for adding Select (MultiSelect, Radio) controls to the lightbox:
1 . Instantiate a control;
2 . Populate it with data (via the AddOptions() method);
3 . Add the control to the lightbox (via the Add() method).
var select = new LightboxSelect("textColor", "Priority");
var items = new List<object>(){
    new { key = "gray", label = "Low" },
    new { key = "blue", label = "Medium" },
    new { key = "red", label = "High" }
};
select.AddOptions(items);
scheduler.Lightbox.Add(select);
Note, to be correctly processed data items for the controls should have the key (the id of an option) and label (the text label of an option) properties.
Creating Custom Editors For Lightbox
General approach
The following instructions explain how to create custom editors for lightbox. Implementation of a custom control falls into two following parts:
1 . Implementation of the client-side logic via JavaScript. Since most of the component's work happens on the client side. This will be the biggest part.
2 . Creation of a server-side wrapper class (C# or VB.NET) in order to add that control to the Lightbox configuration.
1 . Implementation of the client-side logic
All lightbox controls have a rather simple client side which is described here.
To create a custom lightbox control, you should define a new object as follows (JS):
scheduler.form_blocks["my_editor"]={
    render:function(sns){ // sns - section configuration object
        return "html code of the editor here";
    },
    set_value:function(node,value,ev){
        // node - HTML object related to HTML defined above
        // value - value defined by the map_to property
        // ev - event object
        ... code to set value to the element ...
    },
    get_value:function(node,ev){
        // node - HTML object related to HTML defined above
        // event object
        return "current value from editor";
    },
    focus:function(node){
        //node - HTML object related to HTML defined above
        ...code to set focus to the element...
    }
}
The control object must define at least four methods:
- render the core layout when the details form is initialized
- set value to the input
- get value from the input and optionally assign it to event (only in case mapping is hardcoded inside the component)
- put a focus on an input
2 . Creation of a server-side wrapper class
A server-side control is merely a wrapper around the client-side one that allows adding it to the scheduler config and passing config options to JS part.
In order to implement one, you need to extend the DHTMLX.Scheduler.Controls.LightboxField class. It contains the following members:
- Height- Height of editor;
- Label - Label of control;
- MapTo - Property of the event mapped to the editor;
- if you specify 'auto', scheduler will imply that mapping is hardcoded inside the control;
- this value can also be used for implementing 'time' input, since it should be mapped to both 'start_date' and 'end_date' methods.
- Name- Name of the editor (all editors in lightbox must have unique names);
- Type - The editor's type, defines how the editor will be rendered on the client (the value must match the name of object you picked for a client-side control, that's how the server-side class is matched to client-side control).
Any number of custom properties can be added as well, and their values can be passed to the client side
public class MyEditor:LightboxField
{
    public MyEditor(string name, string label = null) : base(name, label)
    {
        this.Height = 60;
        this.Type = "my_editor";
    }
}
Samples
Color input
Implementation of an HTML5 color input for the lightbox (for changing color of an event).
- Client side
<script type="text/javascript">
scheduler.form_blocks["color"] = {
    render: function (sns) {
        return "<div class='dhx_cal_block'><input type='color'/></div>";
    },
    set_value: function (node, value, ev) {
        node.firstChild.value = value || "";
    },
    get_value: function (node, ev) {
        return node.firstChild.value;
    },
    focus: function (node) {
        var a = node; scheduler._focus(a, true);
    }
}
</script>
- Server side
Let's create a wrapper class for color input. We'll use 'color' for the 'Type' value:
public class LightboxColor:LightboxField
  {
    public LightboxColor(string name, string label = null) : base(name, label)
      {
         this.Height = 60;
         this.Type = "color";
      }
  }
Finally, the implemented color input can be added to the lightbox configuration:
var calendar = new DHXScheduler();
...
calendar.Lightbox.Add(new LightboxColor("color", "Event color"));
Number input
Implementation of an HTML5 number input for the lightbox (for displaying numbers).
- Client side
<script type="text/javascript">
scheduler.form_blocks["number"] = {
    render: function (sns) {
        return "<div class='dhx_cal_block'><input type='number' min='1' max='10'/></div>";
    },
    set_value: function (node, value, ev) {
        node.firstChild.value = value || "";
    },
    get_value: function (node, ev) {
        return node.firstChild.value;
    },
    focus: function (node) {
        var a = node; scheduler._focus(a, true);
     }
}
</script>
- Server side
Let's create a wrapper class for a number input. We'll use 'number' for the 'Type' value:
public class LightboxNumber : LightboxField
    {
        public LightboxNumber(string name, string label = null)
            : base(name, label)
        {
            this.Height = 60;
            this.Type = "number";

        }
    }
When it is done, connect your new lightbox component to the scheduler:
var calendar = new DHXScheduler();
...
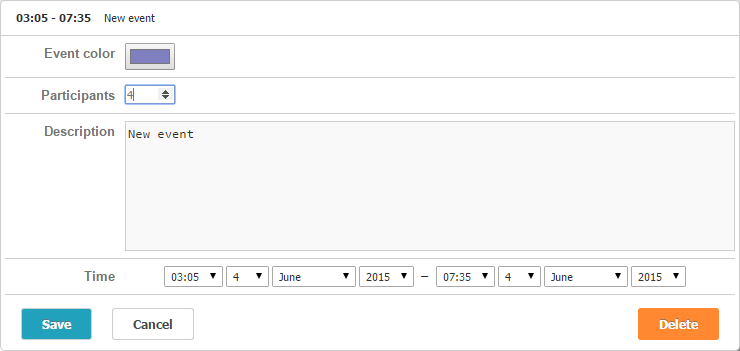
calendar.Lightbox.Add(new LightboxNumber("participants", "Participants"));
As a result, you will get a custom lightbox form as in the picture below:

.Net Form as a Lightbox

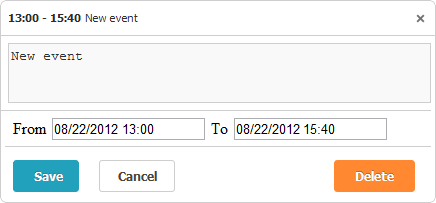
The advantage of the native .NET form is that you can fully configure its logic on the server side. Commonly, all you need to do is to load the form into a view and set this view for the lightbox.
So, to use .Net form as a lightbox you should do the following:
- MVC
View:
Define a view that will be returned as a lightbox: form itself and controls placed upon it
Controller:
1 . To the 3 main actions add one additional action that will return the newly-created view containing your custom form;
2 . Set the partial view as a lightbox (in the SetExternalLightbox() method you should specify the newly added action that will return the desired view);
3 . Define CRUD logic
Web Forms
1 . Define LightBox control
2 . Define handler for changing data in the database
3 . Set external lightbox
MVC
View:
.Net form definition
<%@ Control Language="C#" Inherits="System.Web.Mvc.ViewUserControl<SchedulerTest.Models.Event>" %>
<!--LightboxControl.ascx-->
<!DOCTYPE html />
<html>
<body>
  <% Html.BeginForm("Save", "MVCFormInLightbox"); %>
    <div>
      <%= Html.TextArea("text", Model.text, 5, 42, null)%>
      </div>
      <%= Html.Hidden("id", Model.id)%>
      <div>
        From
        <%= Html.TextBox("start_date", Model.start_date, new { @readonly = "readonly" })%>
        To
        <%= Html.TextBox("end_date", Model.end_date, new { @readonly = "readonly" })%>
      </div>
      <%= Html.Hidden("user_id", Model.user_id)%>
      <p>
        <input type="submit" name="actionButton" value="Save" />
        <input type="button" onclick="lightbox.close()/* helper-method, only available in custom lightbox */" value="Close" />
        <input type="submit" name="actionButton" value="Delete" />
      </p>
  <% Html.EndForm(); %>
</body>
</html>
Controller:
1.Partial view with .Net form
// LightboxControl.cs
public ActionResult LightboxControl(int id) {
    var context = new DHXSchedulerDataContext();
    var current = context.Events.SingleOrDefault(e => e.id == id);
    return View(current);
}
2.Setting .Net form as a lightbox
// LightboxControl.cs
public ActionResult Index() {
    scheduler = new DHXScheduler(this);
    ...
    var box = scheduler.Lightbox.SetExternalLightbox("MVCFormInLightbox/LightboxControl", 420, 195);
    box.ClassName = "custom_lightbox";// if you want to apply your custom style
    return View(scheduler);
}
Method SetExternalLightbox() returns an ExternalLightboxForm object, with the following public properties:
- Width - (integer) the width of the lightbox;
- Height - (integer) the height of the lightbox;
- ClassName - (string) the CSS class that will be applied to the lightbox;
- View - (string) the path to a view that you want to load.
3.CRUD logic
// LightboxControl.cs
public ActionResult Save(Event changedEvent, FormCollection actionValues)
{
    var action = new DataAction(actionValues);
    if (action.Type != DataActionTypes.Error)

    {
      // NativeSave is the default save action for updates
      // which can be performed without using lightbox(e.g. drag-n-drop)
      return NativeSave(changedEvent, actionValues);
    }

// Implementation of create/update/delete operations.
// Note, we use try-catch block to handle exceptions which may be thrown during operations.
// In this case, we must assign the error status to a DataAction object
// in order to mark the appropriate action on the client side as failed.

    action = new DataAction(DataActionTypes.Update, changedEvent.id, changedEvent.id);
    if (actionValues["actionButton"] != null)
    {
       DHXSchedulerDataContext data = new DHXSchedulerDataContext();
       try
       {
         if (actionValues["actionButton"] == "Save")
         {
            if (data.Events.SingleOrDefault(ev => ev.id == action.SourceId) != null)
             {
                changedEvent = data.Events.SingleOrDefault(ev => ev.id == action.SourceId);
                TryUpdateModel(changedEvent);
             }
            else
             {
                action.Type = DataActionTypes.Insert;
                data.Events.InsertOnSubmit(changedEvent);
             }
         }else if(actionValues["actionButton"] == "Delete"){
             action.Type = DataActionTypes.Delete;
             changedEvent = data.Events.SingleOrDefault(ev => ev.id == action.SourceId);
             data.Events.DeleteOnSubmit(changedEvent);
         }
         data.SubmitChanges();
       }

       catch (Exception e)
       {
         action.Type = DataActionTypes.Error;
       }
    }
    else
    {
       action.Type = DataActionTypes.Error;
    }
    return (new SchedulerFormResponseScript(action, changedEvent));
}
Web Forms
In this example we use Web Form named LightboxControl for a custom Lightbox.
1.Define LightBox control
LightboxControl.aspx
Let's add some controls to Lightbox.
<%@ Page Language="C#" AutoEventWireup="true" CodeBehind="LightboxControl.aspx.cs" Inherits="Scheduler.WebForms.LightboxControl" %>
<%@ Import Namespace="System.IO" %>
Â
<!DOCTYPE html>
<html xmlns="http://www.w3.org/1999/xhtml">
<head runat="server">
<title></title>
</head>
<body>
<form id="form1" runat="server" method="POST" enctype="multipart/form-data">
<style> /*some user styles for the lightbox*/
.label {
width: 35px;
}
Â
.text-box {
width: 345px;
}
Â
.date-time {
width: 150px;
}
Â
.label, .text-box, .date-time {
display: inline-block;
}
Â
.text-box, .date-time {
padding: 5px 7px;
-webkit-box-sizing: border-box;
-moz-box-sizing: border-box;
box-sizing: border-box;
}
Â
.block, .buttons {
display: block;
width: 100%;
margin: 10px;
}
Â
.buttons input {
width: 125px;
}
</style>
Â
<div class="block">
<span class="label">Text</span>
<asp:TextBox runat="server" ID="text" CssClass="text-box"></asp:TextBox>
</div>
Â
<div class="block">
<span class="label">From</span>
<asp:TextBox runat="server" ID="start_date" ReadOnly="True" CssClass="date-time"></asp:TextBox>
Â
<span class="label">to</span>
<asp:TextBox runat="server" ID="end_date" ReadOnly="True" CssClass="date-time"></asp:TextBox>
</div>
Â
<asp:HiddenField runat="server" ID="id" />
<div class="buttons">
<input type="submit" name="actionButton" value="Save"/>
<input type="button" value="Cancel" onclick="lightbox.close();/* helper-method, only available in custom lightbox */" />
<input type="submit" name="actionButton" value="Delete" />
</div>
</form>
</body>
</html>
LightboxControl.aspx.cs
This method gets event id from the request and then takes information about this event from the database and places the data into the controls on the page.
protected void Page_Load(object sender, EventArgs e)
{
    form1.Action = ResolveClientUrl("ChangeData.ashx");

    if (Request.QueryString["id"] == null) return;
    var eventId = Int64.Parse(Request.QueryString["id"]);

    var db = new SchedulerContextDb();
    var res = db.Events.SingleOrDefault(item => item.id == eventId);

    if (res != null)
    {
       text.Text = res.text;
       start_date.Text = res.start_date.ToString("G");
       end_date.Text = res.end_date.ToString("G");
       id.Value = res.id.ToString();
    }
    else
    {
       /*new event*/
       text.Text = Request.Params["text"];
       id.Value = Request.QueryString["id"];
       start_date.Text = Request.Params["start_date"];
       end_date.Text = Request.Params["end_date"];
    }
}
2.Define handler for changing data in the database
ChangeData.ashx
There are update, create and delete operations of event.
public void ProcessRequest(HttpContext context)
{
var action = new DataAction(context.Request.Form);
var data = new SchedulerContextDb();
var changedEvent = (Events)DHXEventsHelper.Bind(typeof(Events), context.Request.Form);
try
{
/*
* For user's lightbox DataActionTypes object is null. That is why
* we check which button is was clicked and initialize this object.
*/
if (context.Request["actionButton"] == "Save")
{
if (data.Events.SingleOrDefault(ev => ev.id == changedEvent.id) == null)
{
action.Type = DataActionTypes.Insert;
}
else
{
action.Type = DataActionTypes.Update;
}
}
else if (context.Request["actionButton"] == "Delete")
{
action.Type = DataActionTypes.Delete;
}
Â
switch (action.Type)
{
case DataActionTypes.Insert:
/*
* define here your Insert logic
*/
data.Events.Add(changedEvent);
Â
break;
case DataActionTypes.Delete:
/*
* define here your Delete logic
*/
changedEvent = data.Events.SingleOrDefault(ev => ev.id == action.SourceId);
data.Events.Remove(changedEvent);
break;
default:
/*
* define here your Update logic
*/
var updated = data.Events.SingleOrDefault(ev => ev.id == action.SourceId);
/*
* update "updated" object by changedEvent's values,
* 'id' should remain unchanged
*/
DHXEventsHelper.Update(updated, changedEvent, new List<string>() { "id" });
break;
}
Â
data.SaveChanges();
action.TargetId = changedEvent.id;
Â
if (!string.IsNullOrEmpty(context.Request["actionButton"]))
{
/*
* For user's lightbox
*/
context.Response.Write(new SchedulerFormResponseScript(action, changedEvent).Render());
}
else
{
context.Response.ContentType = "text/xml";
context.Response.Write(new AjaxSaveResponse(action).ToString());
}
Â
}
catch
{
action.Type = DataActionTypes.Error;
}
}
3.Set external lightbox
Let's specify LightBox via the SetExternalLightbox() method:
protected void Page_Load(object sender, EventArgs e)
{
    var scheduler = new DHXScheduler();
    ...
    var box = scheduler.Lightbox.SetExternalLightbox(this.ResolveClientUrl("Calendar/LightboxControl.aspx"), 420, 140);
    // CSS class to be applied to the form
    box.ClassName = "custom_lightbox";
    ...
}