Fully Custom Lightbox
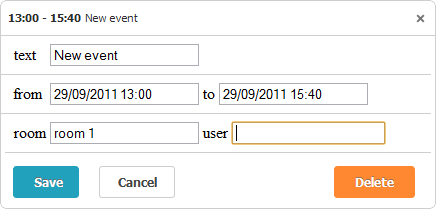
You can specify a custom lightbox for scheduler, e.g. like this one:

To define a custom lightbox you should apply 2 steps:
- Create a view containing a form with the desired controls
- Through the SetExternalLightboxForm() method, 'load' this view into an iframe inside the lightbox popup
var box = sched.Lightbox.SetExternalLightboxForm("PartialViewInLightbox/Form", 640, 180);
box.ClassName = "custom_lightbox";
View Sample
As soon as the view is loaded, a lightbox object with the following methods will be defined in the context of the iframe content window:
- save() - saves changes;
- close() - closes the lightbox and rejects saving;
- remove() - removes an event.
Note, you should define 2 methods for your custom form:
- setValues(object) - takes an event object and sets values for the controls. The scheduler calls the method (after the view is loaded) and passes an edited event to it.
- object getValues() - takes values from the inputs (controls) and returns an event object. The scheduler calls the method to get an event object, update view data and send updated data to the server.
//Form.ascx
<div>
<form id='form1'>
<span class="label">Text</span><input id="Text1" name="text" type="text"/><br />
<span class="label">From</span><input id="Text2" name="start_date" type="text"/>
<span class="label">to</span><input id="Text3" name="end_date" type="text"/><br />
<span class="label">Room_id</span><input id="Text4" name="room_id" type="text"/>
<span class="label">User Id</span><input id="Text5" name="user_id" type="text"/>
<input id="Hidden1" name="id" type="hidden"/>
</form>
<div >
<input type="button" value="Save" onclick="lightbox.save()" />
<input type="button" value="Cancel" onclick="lightbox.close()" />
<input style="margin-left:250px" type="button" value="Delete" onclick="lightbox.remove()" />
</div>
</div>
<script>
Â
getValues = function () {
var ev = {};
var inputs = document.body.getElementsByTagName('input');
Â
for (var i = 0; i < inputs.length; i++) {
if (inputs[i].type == "button") {
continue;
}
var name = inputs[i].getAttribute('name');
if (name == "start_date" || name == "end_date")
ev[name] = parent.scheduler.templates.api_date(inputs[i].value);
else
ev[name] = inputs[i].value;
}
return ev;
};
setValues = function (obj) {
Â
var inputs = document.body.getElementsByTagName('input');
for (var i = 0; i < inputs.length; i++)
if (inputs[i].type != "button") {
var name = inputs[i].getAttribute('name')
if (name == "start_date" || name == "end_date")
inputs[i].value = parent.scheduler.date.date_to_str(parent.scheduler.config.api_date)(obj[name]);
else
inputs[i].value = obj[name];
}
};
Â
</script>
- parent.scheduler.templates.api_date - the function converts the specified string to a date object.
- parent.scheduler.date.date_to_str(parent.scheduler.config.api_date) - converts a date object to a string of the format supported by the scheduler.
SetExternalLightboxForm() Method
The SetExternalLightboxForm() method can be called in 3 ways that differ by the number of parameters:
First way
var form = sched.Lightbox.SetExternalLightboxForm("PartialViewInLightbox/Form", 640, 180);
3 parameters:
- the path to a view that you want to load;
- the width of the lightbox;
- the height of the lightbox.
Second way
var form = sched.Lightbox.SetExternalLightboxForm("PartialViewInLightbox/Form", "classname");
2 parameters:
- the path to a view that you want to load;
- the CSS class that will be applied to the lightbox.
Third way
var form = sched.Lightbox.SetExternalLightboxForm("PartialViewInLightbox/Form");
1 parameter:
- the path to a view that you want to load.
The method returns an ExternalLightboxForm object, with the following public properties:
- Width - (integer) the width of the lightbox;
- Height - (integer) the height of the lightbox;
- ClassName - (string) the CSS class that will be applied to the lightbox;
- View - (string) the path to a view that you want to load.