- Downloading and Installing Scheduler .NET
- How to apply the license key?
- Simple ASP.NET WebForms Application with Scheduler
- Simple ASP.NET MVC Application with Scheduler
- Step 1. Create a new ASP.NET MVC Project
- Step 2. Add the References
- Step 3. Set up a Database
- Step 4. Set Connection to Database
- Step 5. Create an Entity Model
- Step 6. Create a Controller
- Step 7. Create a View
- Scheduler .NET with Entity Framework Database First
- Scheduler .NET with Entity Framework Code First
Simple ASP.NET MVC Application with Scheduler
This tutorial describes the process of adding a scheduler into an ASP.NET MVC C# application. There's also a Video Tutorial available.
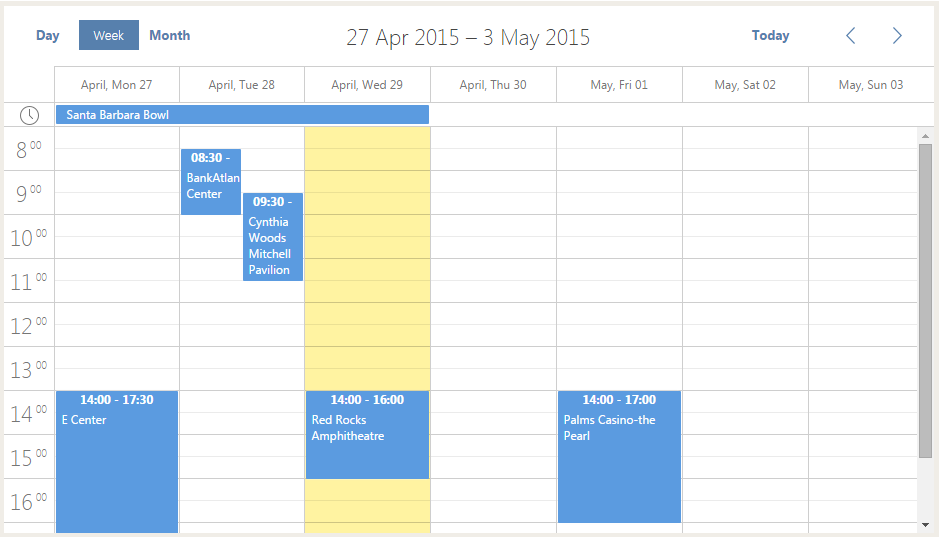
You may follow these simple instructions to create the application or download demos here: Download Scheduler .NET package.
Step 1. Create a new ASP.NET MVC Project
- Open Visual Studio
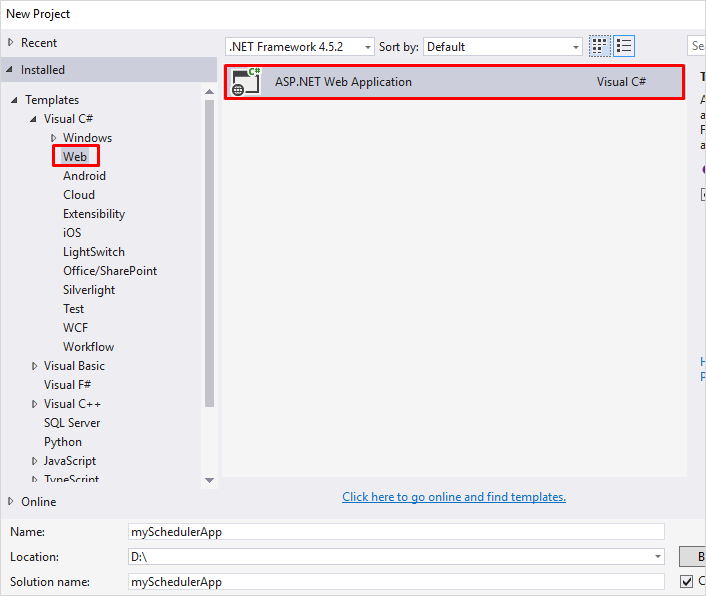
- go to File → New → Project and select ASP.NET Web Application in the desired programming language
- name a new application 'mySchedulerApp'
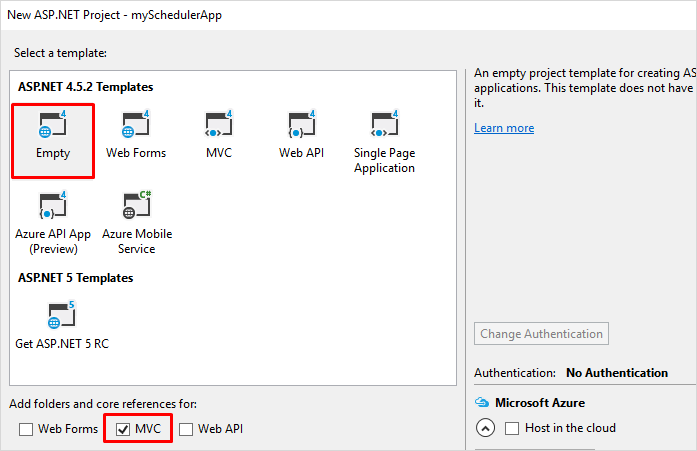
Select an Empty template and tick the MVC box. After that click OK.
Step 2. Add the References
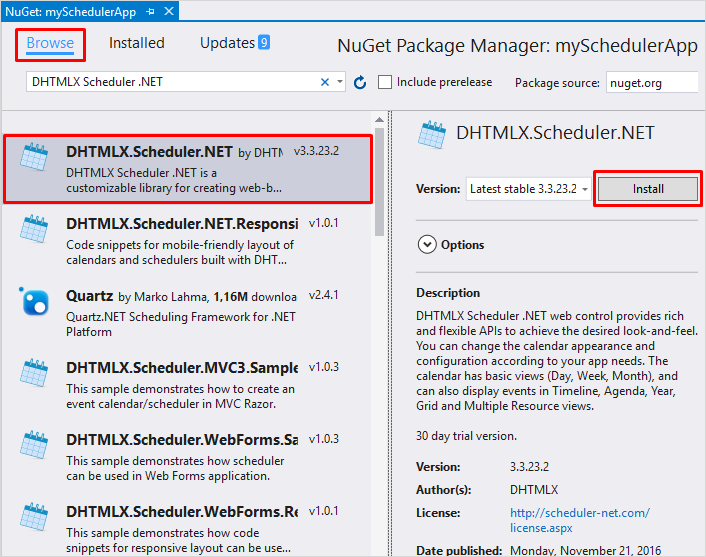
Once you have created a new .NET project, you should add the reference to the required library - Scheduler .Net.
You can make use of the NuGet package for this purpose:
1 . Right click on your project in the Solution Explorer and select Manage NuGet Packages. It will open the Manage NuGet Packages dialog box.
2 . Now select the Online option in the left bar and search for DHTMLX Scheduler .NET and EntityFramework.
Step 3. Set up a Database
At this step, create a database (or use any valid one) to store the calendar events. In this database create the 'Events' table
with the following fields (all fields are mandatory):
- id - (int; primary key, identity) the ID of the event
- text - (nvarchar(256)) the description of the event
- start_date - (datetime) the date and the time the event starts
- end_date - (datetime) the date and the time the event ends
CREATE TABLE [Events](
  [id] int IDENTITY(1,1) NOT NULL,
  [text] nvarchar(256) NULL,
  [start_date] datetime NOT NULL,
  [end_date] datetime NOT NULL,
  PRIMARY KEY (id)
)
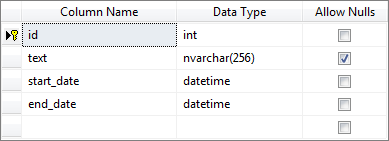
While the DB tool is open, you can add some data to the table.
Step 4. Set Connection to Database
Define the connection string to the database. To do this, open the Web.config file and add the definition of the connection string at the end of the configuration section.
Note that the connection string for Visual Studio 2015 will differ from the connection string used in Visual Studio 2013.
<connectionStrings>
    <add name="SchedulerContext" connectionString="Data Source=(LocalDB)\MSSQLLocalDB;AttachDbFilename=|DataDirectory|\Scheduler.mdf;Integrated Security=True" providerName="System.Data.SqlClient" />
</connectionStrings>
Step 5. Create an Entity Model
Let's create necessary classes for our Calendar. First, we will create simple Event class.
public class Event
{
    public int id { get; set; }
    public string text { get; set; }
    public DateTime start_date { get; set; }
    public DateTime end_date { get; set; }
}
Create a context class which derives from DBContext class and exposes DbSet properties for the types that you want to be part of the model, e.g. Event class, in this case:
public partial class SchedulerContext :DbContext
    {
        public SchedulerContext() : base("name=SchedulerContext"){}
        public virtual DbSet<Event> Events { get; set; }
    }
Step 6. Create a Controller
Create a controller and name it BasicSchedulerController.cs. Copy the following code there:
public class BasicSchedulerController : Controller
    {
        public ActionResult Index()
        {
            var sched = new DHXScheduler(this);
            sched.Skin = DHXScheduler.Skins.Terrace;
            sched.LoadData = true;
            sched.EnableDataprocessor = true;
            sched.InitialDate = new DateTime(2016, 5, 5);
            return View(sched);
        }

        public ContentResult Data()
        {
            return (new SchedulerAjaxData(
                new SchedulerContext().Events
                .Select(e => new { e.id, e.text, e.start_date, e.end_date })
                )
                );
        }

        public ContentResult Save(int? id, FormCollection actionValues)
        {
            var action = new DataAction(actionValues);
            var changedEvent = DHXEventsHelper.Bind<Event>(actionValues);
            var entities = new SchedulerContext();
            try
            {
                switch (action.Type)
                {
                    case DataActionTypes.Insert:
                        entities.Events.Add(changedEvent);
                        break;
                    case DataActionTypes.Delete:
                        changedEvent = entities.Events.FirstOrDefault(ev => ev.id == action.SourceId);
                        entities.Events.Remove(changedEvent);
                        break;
                    default:// "update"
                        var target = entities.Events.Single(e => e.id == changedEvent.id);
                        DHXEventsHelper.Update(target, changedEvent, new List<string> { "id" });
                        break;
                }
                entities.SaveChanges();
                action.TargetId = changedEvent.id;
            }
            catch (Exception a)
            {
                action.Type = DataActionTypes.Error;
            }

            return (new AjaxSaveResponse(action));
        }
    }
The Controller should contain 3 main actions:
- Index() - defines scheduler configuration
- Data() - loads data (events) to the scheduler
- Save() - defines Create/Update/Delete logic
Step 7. Create a View
Controller action Index() exposed by the BasicScheduler class returns a view. The view contains markup and content that is sent to the browser.
You should create your view in the right location:
- create a sub-folder in the Views folder with the name 'BasicScheduler'
- within the sub-folder, create a .cshtml file with the name 'Index'
Copy the following content to the file:
@{
    Layout = null;
}

<!DOCTYPE html>
<html>
<head>
    <title>DHXScheduler initialization sample</title>
    <style>        body {
            background-color: #eee;
        }
    </style>
</head>
<body>
    <div style="height:700px;width:900px;margin:0 auto">
        @Html.Raw(Model.Render())
    </div>
</body>
</html>
Note that, when the scheduler is rendered, it adjusts its height to the height of the parent element. That's why, when you use 'Model.Render()', make sure that the parent container isn't collapsed and has the initial height set. Otherwise, scheduler won't be displayed.
If you are working on a MVC3 project, you may use Razor view engine. In this case initialization code will look like the code below:
<!DOCTYPE html>
<html>
<head>
    <title></title>
    <style type="text/css">
     html, body
     {
         height:100%;
         padding:0px;
         margin:0px;
     }
    </style>
</head>
<body>
    <h2>Basic Initialization</h2>
    @Html.Raw(Model.Render())
</body>
</html>
Note, in the RouteConfig class you should set the 'controller' parameter to 'BasicScheduler'. Leave the remaining parameters as they are.
routes.MapRoute(
    name: "Default",
    url: "{controller}/{action}/{id}",
    defaults: new { controller = "BasicScheduler", action = "Index", id = UrlParameter.Optional }
);
That's all. A basic ASP.NET MVC C# Application with Scheduler is ready for use.