DHXScheduler.Templates
The library allows you to specify different templates. They can be used to change displaying of dates and titles in the scheduler.
Common Logic
To define the desired template, write it as it's stated in this documentation below, just by changing DHXScheduler to the name of your DHXScheduler instance.
var sched = new DHXScheduler();
...
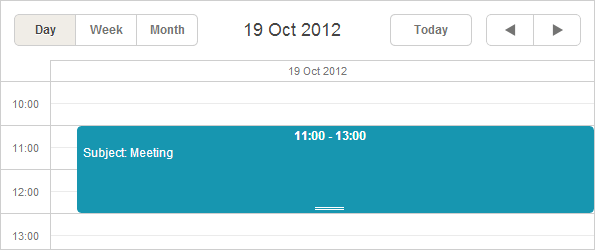
sched.Templates.event_text = "Subject: {text}";
As a result of this, the generated page will contain the following code:
scheduler.templates.event_text = function(start,end,ev){
   return 'Subject: ' + ev.text + '';
};
JavaScript Templates Definitions
The server-side library allows you to set various templates. But when you need to provide really complex logic, it's better to set the template on the client side.
There are several types of templates (depending on the number of input parameters):
- TemplateTypes.Date
- TemplateTypes.MonthLink
- TemplateTypes.Period
- TemplateTypes.Event
- TemplateTypes.Timeline
- TemplateTypes.TimelineCell
The full list of default JavaScript definitions for all the supported templates is given in the corresponding article.
Below you will find the list of templates grouped according to the view they are applied to.
Views-Specific Templates
Below you will find the list of templates according to the related views.
- Default Views
- Extra Views
- Common for All Views
Default Views
Day View
Available templates:
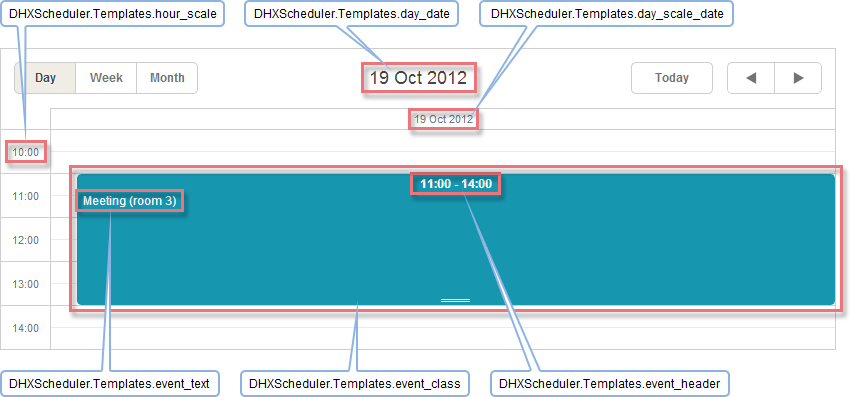
- DHXScheduler.Templates.day_date - the date in the header.
- DHXScheduler.Templates.day_scale_date - the date in the sub-header.
- DHXScheduler.Templates.event_class - the CSS style for the event container.
- DHXScheduler.Templates.event_header - the header of an event.
- DHXScheduler.Templates.event_text - the text of an event.
- DHXScheduler.Templates.hour_scale - the items of the Y-Axis.
Month View
Available templates:
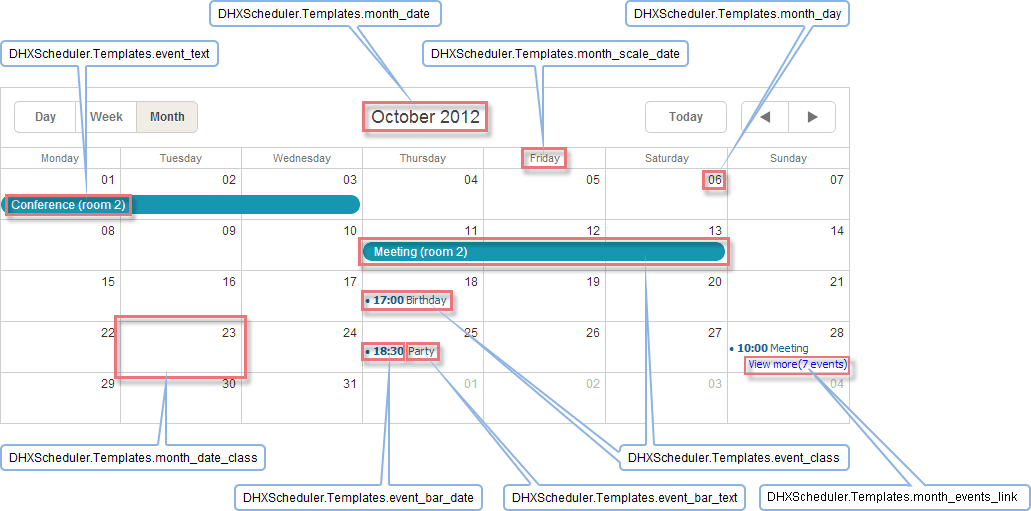
- DHXScheduler.Templates.event_bar_date- the date of an event. Applied to one-day events.
- DHXScheduler.Templates.event_bar_text - the text of an event. Applied to one-day events.
- DHXScheduler.Templates.event_class - the CSS style for the event container. Applied to both one-day and multi-day events.
- DHXScheduler.Templates.event_text - the text of an event. Applied to multi-day events.
- DHXScheduler.Templates.month_date - the date in the header of the view.
- DHXScheduler.Templates.month_date_class - the CSS style for a day cell.
- DHXScheduler.Templates.month_day - the format of the day in a cell.
- DHXScheduler.Templates.month_events_link - the 'View more' link in the cell. Applied to both one-day and multi-day events.
- DHXScheduler.Templates.month_scale_date - the name of the day in the week header of the view.
Week View
Available templates:
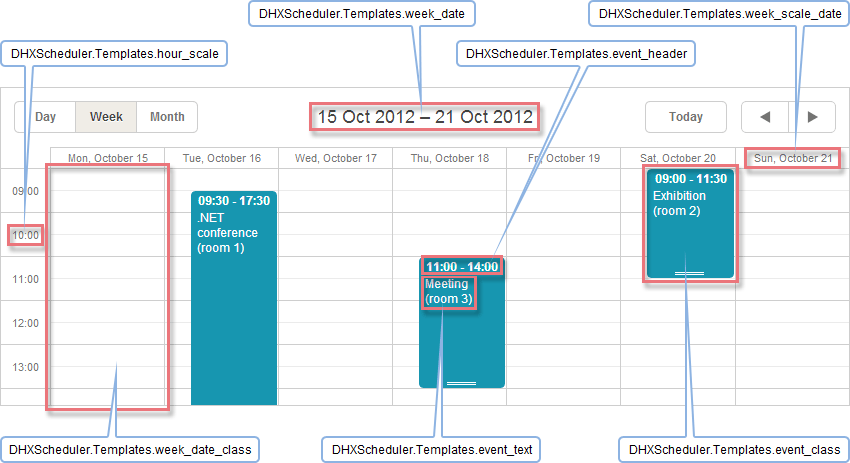
- DHXScheduler.Templates.event_class - the CSS style for the event container.
- DHXScheduler.Templates.event_header - the header of an event.
- DHXScheduler.Templates.event_text - the text of an event.
- DHXScheduler.Templates.hour_scale - the items of the Y-Axis.
- DHXScheduler.Templates.week_date - the date in the header of the view.
- DHXScheduler.Templates.week_date_class - the CSS style for a day cell.
- DHXScheduler.Templates.week_scale_date - the date in the sub-header of the view.
Extra Views
Agenda View
Available templates:
- DHXScheduler.Templates.agenda_text - the text in the second column of the view.
- DHXScheduler.Templates.agenda_time- the date in the first column of the view.

Note, if the DHXScheduler.Templates.agenda_text template isn't specified, the 'd-m-y' part of the date will be set according to DHXScheduler.Templates.day_date (28 Sep 2011 in the above picture).
Map View
Available templates:
- DHXScheduler.Templates.map_text - the text in the second column of the view.
- DHXScheduler.Templates.map_time - the date in the first column of the view.
- DHXScheduler.Templates.marker_date - the date of an event in the Google Maps popup marker.
- DHXScheduler.Templates.marker_text - the text of an event in the Google Maps popup marker.
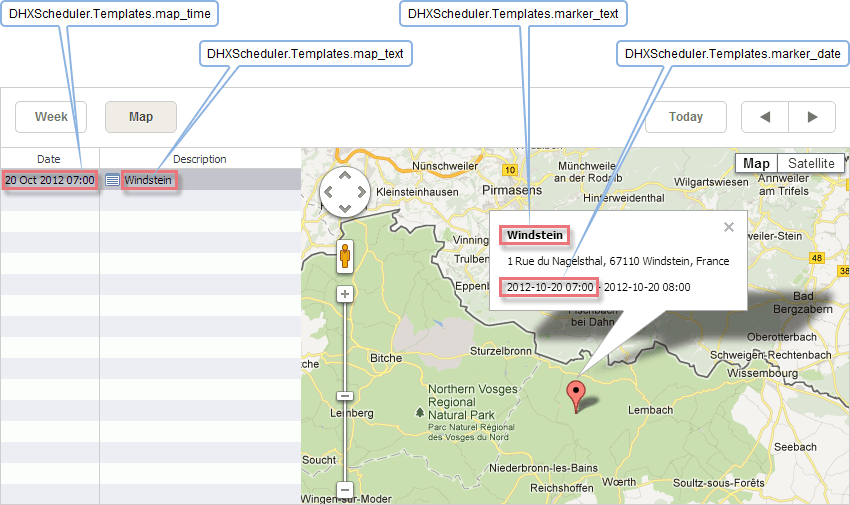
Note, if the DHXScheduler.Templates.map_time template isn't specified, the 'd-m-y' part of the date in the google maps popup marker will be set according to DHXScheduler.Templates.day_date (2011-09-03 in the above picture).
Timeline View
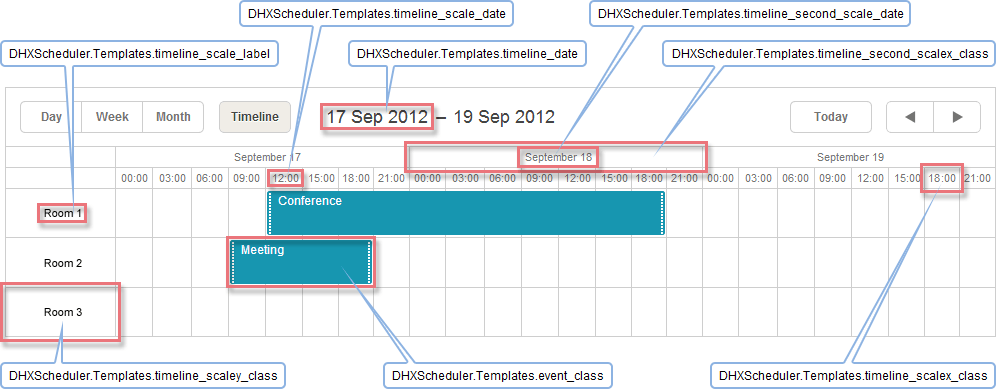
Available templates:
- DHXScheduler.Templates.timeline_date - the date in the header of the view.
- DHXScheduler.Templates.event_class - the CSS style for the event container.
- DHXScheduler.Templates.timeline_scale_date- the items of the X-Axis.
- DHXScheduler.Templates.timeline_scale_label - the items of the Y-Axis.
- DHXScheduler.Templates.timeline_scalex_class - the CSS style for items of the X-Axis.
- DHXScheduler.Templates.timeline_scaley_class - the CSS style for items of the Y-Axis.
- DHXScheduler.Templates.timeline_second_scale_date- the items of the second X-Axis.
- DHXScheduler.Templates.timeline_second_scalex_class - the CSS style for the items of the second X-Axis.
Note, if the DHXScheduler.Templates.timeline_date template isn't specified, the date in the header will be set according to DHXScheduler.Templates.week_date.
Cell Mode Personality
Available templates:
- DHXScheduler.Templates.timeline_cell_class - the CSS style for a cell.
- DHXScheduler.Templates.timeline_cell_value - the value presenting the number of scheduled events in a cell of the view.
- DHXScheduler.Templates.timeline_tooltip - the tooltip over a cell containing some scheduled event(s).

WeekAgenda View
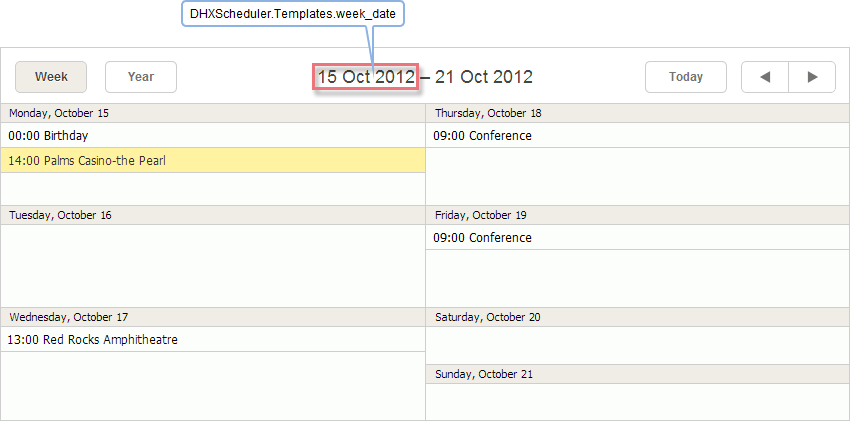
Available templates:
- DHXScheduler.Templates.week_date - the date in the header of the view.
Units View
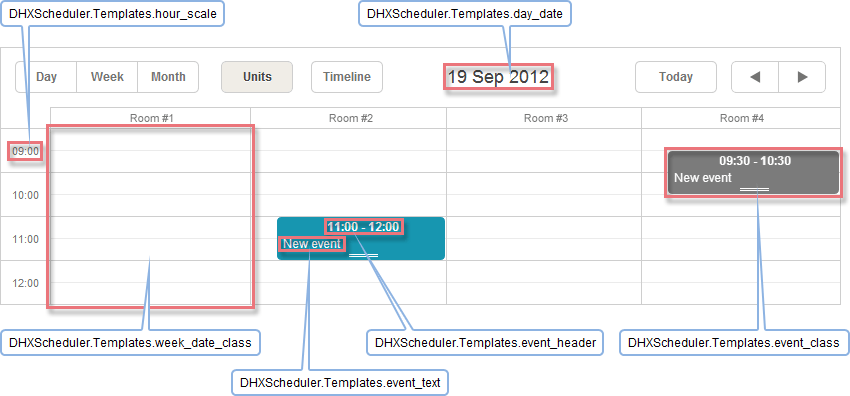
Available templates:
- DHXScheduler.Templates.day_date - the date in the header of the view.
- DHXScheduler.Templates.event_class - the CSS style for the event container.
- DHXScheduler.Templates.event_header - the header of an event.
- DHXScheduler.Templates.event_text - the text of an event.
- DHXScheduler.Templates.hour_scale- the items of the Y-Axis.
- DHXScheduler.Templates.week_date_class - the CSS style for a day cell.
Year View
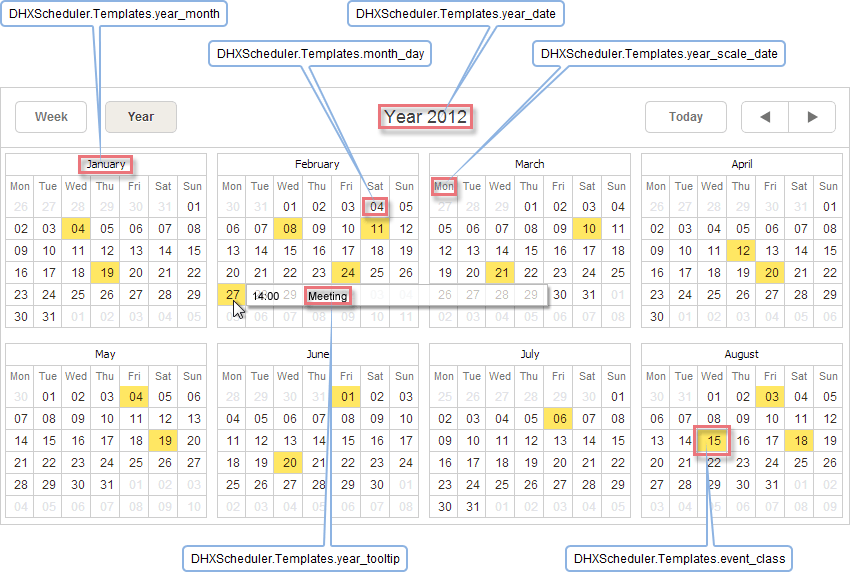
Available templates:
- DHXScheduler.Templates.event_class - the CSS style for the event container.
- DHXScheduler.Templates.month_day - the format of the day in a cell.
- DHXScheduler.Templates.year_date - the date in the header of the view.
- DHXScheduler.Templates.year_month - the name of a month in the header of a month block of the view.
- DHXScheduler.Templates.year_scale_date - the name of a day in the sub-header of a month block of the view.
- DHXScheduler.Templates.year_tooltip - the tooltip over a day cell containing some scheduled event(s).
Common for All Views
Lightbox
Available templates:
- DHXScheduler.Templates.lightbox_header - the header of the lightbox.
- DHXScheduler.Templates.time_picker - the drop-down time selector in the lightbox.
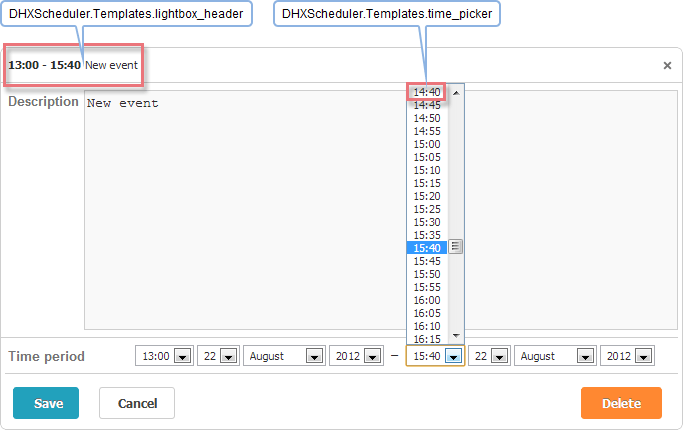
Note, if the DHXScheduler.Templates.lightbox_header template isn't specified, the date part of the header will be set according to DHXScheduler.Templates.event_header (04:00 - 04:05 in the picture above).
Tooltips
You have the possibility to create tooltips over events regardless of the type of a view. This could be used to display additional event information without the need of 'opening' the event.
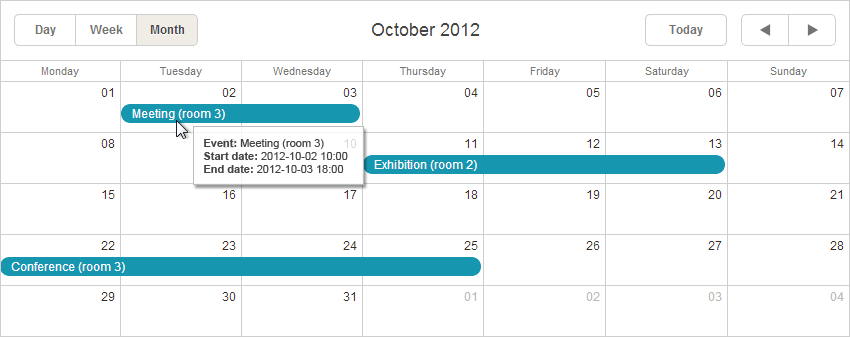
To take the possibility you should:
- Add the dhtmlxscheduler_tooltip.js file to the Scripts folder.
- Add the following line to the code to activate extension:
sched.Extensions.Add(SchedulerExtensions.Extension.Tooltip);// 'sched' is an DHXScheduler instance
After performing these 2 steps, tooltips will be displayed with the default settings. To set a custom look, use the DHXScheduler.Templates.tooltip_text template.
- DHXScheduler.Templates.tooltip_text - the text of tooltips.
Touch Support
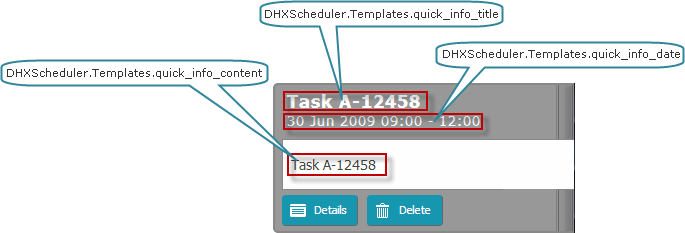
Scheduler .Net provides a special extension 'Quick Info' to enable touch support for its applications. You can read more on the topic in the related chapter - 'Touch support in Scheduler .Net'.
The extension supplies 3 templates:
- DHXScheduler.Templates.quick_info_content - the content of the pop-up edit form;
- DHXScheduler.Templates.quick_info_date - the date of the pop-up edit form;
- DHXScheduler.Templates.quick_info_title - the title of the pop-up edit form.
API Templates
Available templates:
- DHXScheduler.Templates.api_date - the format for dates that are set by means of API methods. Used to parse incoming dates.
- DHXScheduler.Templates.xml_date - a string from an XMLfile is converted into a date object in conformity with this template.
- DHXScheduler.Templates.xml_format - a date object is converted into a string in conformity with this template. Used to send data back to the server.
Complex Templates
To provide complex scenarios (such as conditions, loops, etc.) and use JavaScript code in templates, the library supports ASP.NET-like syntax.
The supported tags are: <%...%> and <%=...%>.
var sched = new DHXScheduler();
...
sched.Templates.event_text = "<% if(ev.start_date.valueOf() < new Date().valueOf()) { %>
                                  Subject: {text}(expired)
                              <% } else { %>
                                  Subject: {text}
                              <% } %>";
Output Formatters
Setting the Date Format
You can use templates to set the desired format for displayed dates.
sched.Templates.day_scale_date = "{date:date(%d.%m.%Y)}";
The available format characters and combinations are given here.
How to Apply a Template
Generally, the format for a date is set as in:
DHXScheduler.Templates.[templateName] = "propertyName:date(someFormat)"
To learn the properties used for a certain template, check the input parameters of the related JavaScript function.
For example, you want to change the format of the date in the sub-header of the Day view:

Your need to take the following steps:
- Look up the corresponding template in the Views-Specific Templates section
- Choose the desired template among those related to the Day View - DHXScheduler.Templates.day_scale_date. Click the related link of the template and here it is, the default JavaScript definition:
scheduler.templates.day_scale_date = function(date){
    return scheduler.date.date_to_str(scheduler.config.default_date);
};
- You see that the function takes a parameter with the name date. So, to set the necessary format, you write:
public virtual ActionResult Index()
{
    var sched = new DHXScheduler(this);
    sched.Templates.day_scale_date = "{date:date(%d.%m.%Y)}";
    ...
    return View(sched);
}