Data Export via Scheduler API
In this article we will discuss the possibility to export Scheduler data into different formats via Scheduler API. There's a more modern way of data export with the help of the online export service
Export to PDF
One-page export
Generally, export to PDF can be implemented in 2 ways:
Both ways use the DHXScheduler.ToPDF() method to invoke the export. The method enables scheduler serialization and passes serialized data to a handler (online service, controller action) for generating a PDF document.
There are 3 ways to call the DHXScheduler.ToPDF() method:
- DHXScheduler.ToPDF() - only if you use the online export service! In this case the method sets the url parameter to the default value
- DHXScheduler.ToPDF(string url)
- DHXScheduler.ToPDF(string url, ExportColorScheme color)
The parameters are:
- url - (string) the url to the action implementing the export or online service that will generate a PDF file.
- color - (enum ExportColorScheme) specifies color map
- enum DHTMLX.Scheduler.ExportColorScheme:
- "Color" - full-color printing, default value
- "Gray" - prints in shades of black and white
- "BlackWhite" - uses only black and white colors
- "FullColor" - actual background and text colors used while exporting
- enum DHTMLX.Scheduler.ExportColorScheme:
Using the server-side online export service
- In the Controller
Add PDF extension:
public override ActionResult Index() {
    var sched = new DHXScheduler();
    ...
    sched.Extensions.Add(SchedulerExtensions.Extension.PDF);
    ...
}
- In the View
Call the ToPDF() method. For example, if you add a button by clicking on which scheduler will start exporting, its code will be the following:
<input type="button" value="Print" onclick="<%= Model.ToPDF("http://dhtmlxscheduler.appspot.com/export/pdf")%>"/>Using the server-side export library
Instead of using the online export service, you can download the Export package (download link) and call the ToPDF() method as in:
For ASP.NET MVC
View:
<input type="button" value="ToPdf" onclick="<%= Model.ToPDF(Url.Action('Export', 'ExportController'), ExportColorScheme.Gray)%>" />Controller ('ExportController'):
using DHTMLX.Export.PDF;
....

public ActionResult Export()
{
    var generator = new SchedulerPDFWriter();
    var xml = this.Server.UrlDecode(this.Request.Form["mycoolxmlbody"]);
    MemoryStream pdf = generator.Generate(xml);
    return File(pdf.ToArray(), generator.ContentType);
}
For ASP.NET
<input type="button" value="ToPdf" onclick="<%= this.Scheduler.ToPDF(this.ResolveUrl('~/Export.ashx'))%>"/>Handler:
public void ProcessRequest(HttpContext context)
{
    var generator = new SchedulerPDFWriter();
    context.Response.ContentType = generator.ContentType;
    var xml = context.Server.UrlDecode(context.Request.Form["mycoolxmlbody"]);
    var pdfStream = generator.Generate(xml);

    pdfStream.WriteTo(context.Response.OutputStream);
}
Multi-page export
There is a possibility to export into a document several view pages at once. For this purpose you should use the DHXScheduler.ToPDFRange() method.
The method has 6 overloads:
- DHXScheduler.ToPDFRange(string url, int days)
- DHXScheduler.ToPDFRange(string url, int days, ExportColorScheme scheme)
- DHXScheduler.ToPDFRange(string url, int days, ExportColorScheme scheme, string view)
- DHXScheduler.ToPDFRange(string url, DateTime start, DateTime end)
- DHXScheduler.ToPDFRange(string url, DateTime start, DateTime end, ExportColorScheme scheme)
- DHXScheduler.ToPDFRange(string url, DateTime start, DateTime end, ExportColorScheme scheme, string view)
The parameters are:
- url - the URL of the action implementing the export or online service that will generate a PDF file
- start - the date to start export from
- end - the date to end export at
- view - the view to apply export to. By default, the currently active view
- days - sets the number of days (starting from the current one) that should be exported. Alternative to the start and end parameters
- scheme - specifies color map
- enum DHTMLX.Scheduler.ExportColorScheme:
- "Color"- full-color printing, default value
- "Gray" - prints in shades of black and white
- "BlackWhite" - uses only black and white colors
- "FullColor" - actual background and text colors used while exporting
- enum DHTMLX.Scheduler.ExportColorScheme:
<input type="button" value="Print" onclick="<%= Model.ToPDFRange("http://dhtmlxscheduler.appspot.com/export/pdf", new Date(2012,0,1), new Date(2012, 1,1))%>"/>Export to iCal
Client-side export
Follow the instructions below to export data from a scheduler into an iCal file:
1) Update the Controller file:
- add serialization support
public override ActionResult Index(){
    var sched = new DHXScheduler();
    ...
    sched.Extensions.Add(SchedulerExtensions.Extension.Serialize);
    ...
}
- create an action that will define exporting logic
public ActionResult Export() {
    Response.ContentType = "text/plain";
    Response.AppendHeader("content-disposition", "attachment; filename=dhtmlxScheduler.ics");
    return Content(Request.Form["data"].ToString());
}
2) In the View you should call the toICal() method.
For example, if you add a button by clicking on which the scheduler will start exporting, its code will be the following:
<input type="button" value="Print" onclick="<%= Model.ToICal("/ExportToICal/Export", "data")%>" />There are 3 possible ways to call the method:
- Model.ToICal(string url);
where 'url' is the path related to an action implementing export
- Model.ToICal(string url,string name);
where 'name' is the name of the POST parameter
- Model.ToICal();
the method uses default 'url' and 'name' parameters which are '/%ControllerName%/Export' and 'data'
Server-side export
To get data in the iCal format directly from the DB, you should use the DHTMLX.Scheduler.Data.ICalRenderer class, particularly the method string ICalRenderer.ToICal().
The ICalRenderer.ToICal() method has 4 overloads:
- public string ToICal(IEnumerable events)
- public string ToICal(IEnumerable events, string description)
- public string ToICal(IEnumerable events, Action<StringBuilder, object> renderer)
- public string ToICal(IEnumerable events, Action<StringBuilder, object> renderer, string description)
- events - the collection of events in the default scheduler format
- description - adds the DESCRIPTION key to the output iCal object. By default, export will include only standard keys: DTSTART, DTEND, SUMMARY
- renderer - a custom function that renders event objects into an iCal string
var renderer = new ICalRenderer();
var events = new DHXSchedulerDataContext().Events;

string result = renderer.ToICal(events);
When to use the 'renderer' function
The built-in serializer exports only 3 data properties: start_date, end_date and text. If you want to export some other data properties or change serializing of the 3 mentioned properties - 'renderer' comes in handy.
var renderer = new ICalRenderer();
var events = new DHXSchedulerDataContext().Events;

string result = renderer.ToICal(events, RenderItem, "description");
and the RenderItem function can look as in:
public void RenderItem(StringBuilder builder, object item)
{
   var ev = item as Event;

   builder.AppendLine("BEGIN:VEVENT");
   builder.AppendLine(string.Format("DTSTART:{0:yyyyMMddTHmmss}", ev.start_date));
   builder.AppendLine(string.Format("DTEND:{0:yyyyMMddTHmmss}", ev.end_date));
   builder.AppendLine(string.Format("SUMMARY:{0}", ev.text));
   builder.AppendLine("END:VEVENT");
}
The DHTMLX.Scheduler.Data.ICalRenderer class has 3 properties that store the names of data properties to be exported:
- public string StartDate { get; set; } - default value 'start_date'
- public string EndDate { get; set; } - default value 'end_date'
- public string Text { get; set; } - default value 'text'
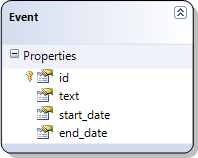
So, by default, the serializer expects event's text description to be stored in the item.text property and the start and end dates - in item.start_date and item.end_date respectively:

If you store data in properties with some other names you can specify new values for those properties.
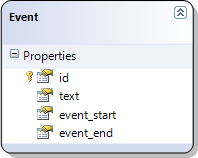
Let's assume you have data as in:

In this case, you should set new values for the DHTMLX.Scheduler.Data.ICalRenderer properties as in:
var renderer = new ICalRenderer();
renderer.StartDate = "event_start";
renderer.EndDate = "event_end";
See the client-side documentation for more details.