In this short yet detailed tutorial we will lead you through the basic steps of creating a VB Scheduler/Calendar in ASP.NET and ASP.NET MVC3. As stated before, we converted DHTMLX Scheduler .NET C# samples to visual basic. This allows the adherents of visual basic to create a simple Google-like event calendar in their favorite programming language.
By its structure the tutorial reminds the previously published tutorial for ASP.NET event calendar coded in С#. It covers the main steps of scheduler creation.
By following this 8 step tutorial you’ll get a nice-looking rich-featured VB.NET event calendar with a server-side backend:
You can download the ready VB.NET calendar sample right now, or proceed with our tutorial.
Let’s start from the very beginning.
Step 1. Create a New Scheduler Project
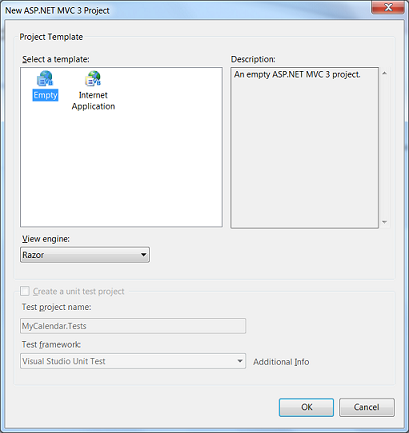
Download and unzip the DHMTLX Scheduler .NET archive. Create a new visual basic project using MVC3 Web Application. Let's name it MyCalendar and use the default template settings - Empty project template (because we create a scheduler from scratch) and Razor view engine (to generate the scheduler dynamic web pages):
Step 2. Add Scripts and the Library Reference
Copy the DHTML.dll library to your project folder from the unzipped Scheduler package (bin folder). The dhtmlxScheduler found in the Scripts folder of the package root directory should also be added to the Scripts folder of your newly created project. Right-click on the “MyCalendar” project in the Solution Explorer to add the required reference.
Step 3. Set up a New Data Base
Now we need a database to store the calendar events. To implement this, go to the Solution Explorer and add a new ASP.NET folder App_Data. Then create a new SQL Server Database and name it MyCalendar.mdf. A new database has been created.
Righ-click on the Tables folder in the Sever Explorer to add a new table ‘Events’. Fill it in with the following content:

Note! Set primary key to id and enable the identity column.
Step 4. Create a Data Model
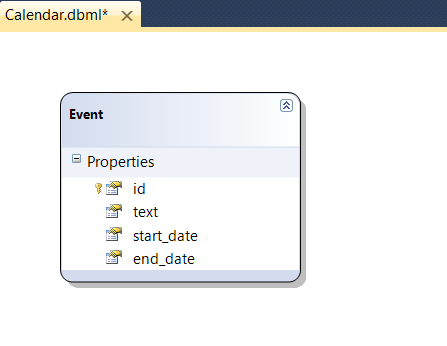
Go to Models to add a new item. Select Data from the Visual Basic installed templates and choose select LINQ to SQL Classes. Name it Calendar.dbml. Drag the ‘Events’ table to the designer surface.
Step 5. Create an Event Calendar
We have approached the step of building the event calendar itself.
At first, we create CalendarController.vb and configure it by adding the required namespaces and the related data:
Imports DHTMLX.Scheduler
Imports DHTMLX.Scheduler.Data
Imports DHTMLX.Common

Namespace MyCalendar
    Public Class CalendarController
        Inherits System.Web.Mvc.Controller

        Function Index() As ActionResult
            Dim scheduler = New DHXScheduler()

            scheduler.Config.first_hour = 8
            scheduler.Config.last_hour = 19

            Return View(scheduler)
        End Function

    End Class
End Namespace
Then proceed with building a View to make our calendar show up on the web page. For this purpose, we create Views/Calendar/Index.vbhtml:
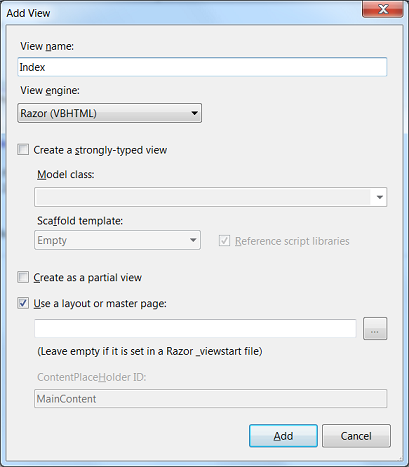
It has a simple coding:
@Code
	ViewData("Title") = "DHXScheduler"
End Code

<div style="height:510px;">
@Html.Raw(Model.Render())
</div>
Let's customize the look and feel of our calendar. Go to Content/Site.css to change the default styles. The following coding shows how we can set up the background theme and change the page size:
body
{
	font-size: 75%;
	font-family: Verdana, Tahoma, Arial, "Helvetica Neue", Helvetica, Sans-Serif;
	color: #232323;
	background-color: #5C87B2;
	width:960px;
	margin:0 auto;
}
To make all things work together, change the default route in Global.asax from ‘Home’ to ‘Calendar’ as it is shown below:
New With {.controller = "Calendar", .action = "Index", .id = UrlParameter.Optional} _
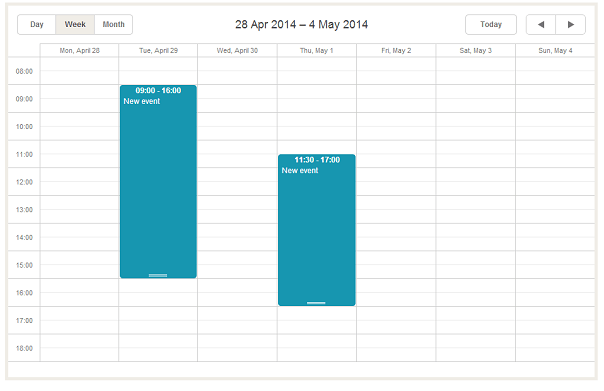
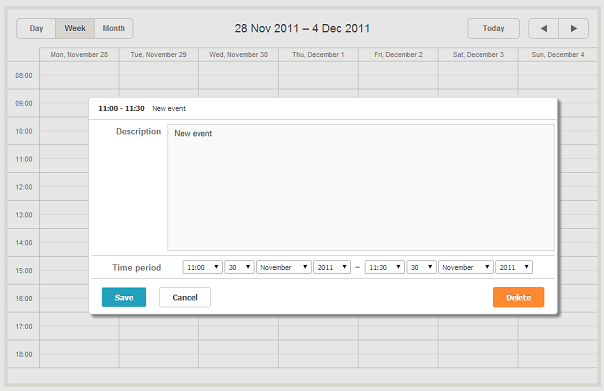
A simple event calendar has been created. It incorporates a form that opens on double click when you create an event. The form includes an event description and date and time drop-down lists.
You can add new events to the calendar now but after page reload nothing is saved. In the next steps we will enable data loading and saving.
Step 6. Load and Save Data
Go to CalendarController.vb to update the logic for data loading and saving.
Public Function Data() As ContentResult
  	Return New SchedulerAjaxData((New CalendarDataContext()).Events)
End Function

Public Function Save(ByVal id As System.Nullable(Of Integer), ByVal actionValues As FormCollection) As ContentResult

        	Dim action = New DataAction(actionValues)

        	Dim data As New CalendarDataContext()
        	Try

            	Dim changedEvent = DirectCast(DHXEventsHelper.Bind(GetType([Event]), actionValues), [Event])
            	Select Case action.Type
                	Case DataActionTypes.Insert
                        data.Events.InsertOnSubmit(changedEvent)
                    	Exit Select
                	Case DataActionTypes.Delete
                    	changedEvent = data.Events.SingleOrDefault(Function(ev) ev.id = action.SourceId)
                        data.Events.DeleteOnSubmit(changedEvent)
                    	Exit Select
                	Case Else
                    	' "update"
                    	Dim eventToUpdate = data.Events.SingleOrDefault(Function(ev) ev.id = action.SourceId)
                        DHXEventsHelper.Update(eventToUpdate, changedEvent, New List(Of String)() From {"id"})
                    	Exit Select
            	End Select
           	 data.SubmitChanges()
            	action.TargetId = changedEvent.id
        	Catch a As Exception
            	action.Type = DataActionTypes.[Error]
        	End Try

        	Return (New AjaxSaveResponse(action))
End Function
Step 7. Update the Scheduler Configuration
Add the saving and loading function to the scheduler settings:
scheduler.LoadData = True
scheduler.EnableDataprocessor = True
scheduler.PreventCache()

scheduler.SaveAction = Url.Action("Save", "Calendar")
scheduler.DataAction = Url.Action("Data", "Calendar")
The full code should look as follows:
Imports DHTMLX.Scheduler
Imports DHTMLX.Scheduler.Data
Imports DHTMLX.Common

Namespace MyCalendar
	Public Class CalendarController
    	Inherits System.Web.Mvc.Controller

    	Function Index() As ActionResult
        	Dim scheduler = New DHXScheduler()

        	scheduler.Config.first_hour = 8
        	scheduler.Config.last_hour = 19

        	scheduler.LoadData = True
        	scheduler.EnableDataprocessor = True
        	scheduler.PreventCache()

        	scheduler.SaveAction = Url.Action("Save", "Calendar")
        	scheduler.DataAction = Url.Action("Data", "Calendar")

        	Return View(scheduler)
    	End Function

    	Public Function Data() As ContentResult
        	Return New SchedulerAjaxData((New CalendarDataContext()).Events)
    	End Function

    	Public Function Save(ByVal id As System.Nullable(Of Integer), ByVal actionValues As FormCollection) As ContentResult

        	Dim action = New DataAction(actionValues)

        	Dim data As New CalendarDataContext()
            Try

            	Dim changedEvent = DirectCast(DHXEventsHelper.Bind(GetType([Event]), actionValues), [Event])
            	Select Case action.Type
                	Case DataActionTypes.Insert
                    	data.Events.InsertOnSubmit(changedEvent)
                    	Exit Select
                	Case DataActionTypes.Delete
                    	changedEvent = data.Events.SingleOrDefault(Function(ev) ev.id = action.SourceId)
                    	data.Events.DeleteOnSubmit(changedEvent)
                    	Exit Select
                	Case Else
                    	' "update"
                    	Dim eventToUpdate = data.Events.SingleOrDefault(Function(ev) ev.id = action.SourceId)
                    	DHXEventsHelper.Update(eventToUpdate, changedEvent, New List(Of String)() From {"id"})
                    	Exit Select
            	End Select
            	data.SubmitChanges()
            	action.TargetId = changedEvent.id
        	Catch a As Exception
            	action.Type = DataActionTypes.[Error]
        	End Try

        	Return (New AjaxSaveResponse(action))
    	End Function

	End Class
End Namespace
Now your events are saved after page refresh.
Step 8. Customization Settings
Let's set the default duration for events by setting the time step to 30 minutes in the calendar controller:
Function Index() As ActionResult
    Dim scheduler = New DHXScheduler()

       ....

    scheduler.Config.time_step = 30
    Return View(scheduler)
End Function
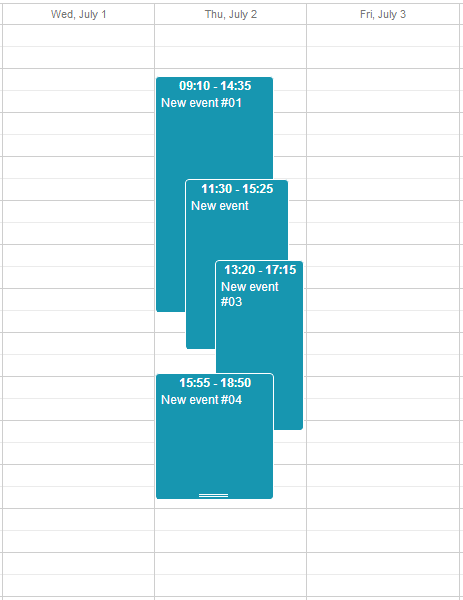
To display time overlapping events, use the following cascade method:
scheduler.Config.cascade_event_display = True
Enable the dynamic loading in the Scheduler configuration. It is needed to avoid excessive loadings and load only the events of the viewable area of the calendar:
Function Index() As ActionResult
    ...
    scheduler.EnableDynamicLoading(SchedulerDataLoader.DynamicalLoadingMode.Month)

    Return View(scheduler)
End Function

Public Function Data() As ContentResult

    Dim dateFrom = DateTime.ParseExact(Me.Request.QueryString("from"), "yyyy-MM-dd", CultureInfo.InvariantCulture)
    Dim dateTo = DateTime.ParseExact(Me.Request.QueryString("to"), "yyyy-MM-dd", CultureInfo.InvariantCulture)

    Return New SchedulerAjaxData(New CalendarDataContext().Events _
                                         .Where(Function(ev) ev.start_date < dateTo And ev.end_date > dateFrom) _
                                         )

End Function
The VB Scheduler is ready and can be embedded on your website.
In this tutorial we have demonstrated how an event calendar in visual basic can be implemented from scratch. If you prefer to skip it, just download the ready sample that can be easily integrated into your ASP.NET application.
If this tutorial was useful to you, please share it with your friends and comment below.