Most of our samples utilize LINQ to SQL to define a database schema. In this short tutorial we’ll show you how it can be accomplished with Entity Framework. This tutorial covers Model First approach. You can also check out relevant tutorials for Code First and Database First development.
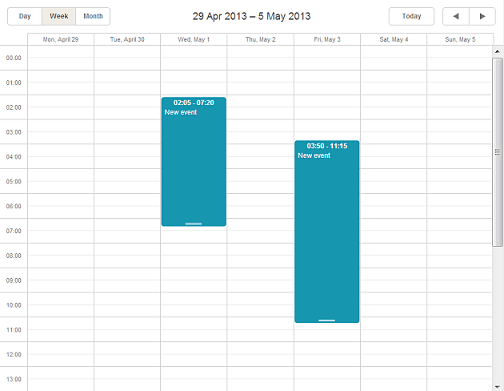
We’ll create a simple event calendar in ASP.NET with basic views and functionality like on the picture below:
To save your time and efforts, we have included a ready sample, available upon subscription to our newsletter:
Take 5 minutes to create your our event calendar with DHTMLX Scheduler .NET web control. Simply follow the steps described below:
Step 1. New Web Application
Let’s create a new ASP.NET MVC4 Web Application in Visual Studio 2012. Name it ‘EventCalendarEF’.
Step 2. Create a Model
First we need to create an ADO.NET Entity Data Model in Visual C# Data template. Name it CalendarData.edmx.
Select Empty Model in the Entity Data Model Wizard and press Enter. An empty Entity Framework Designer will open up.
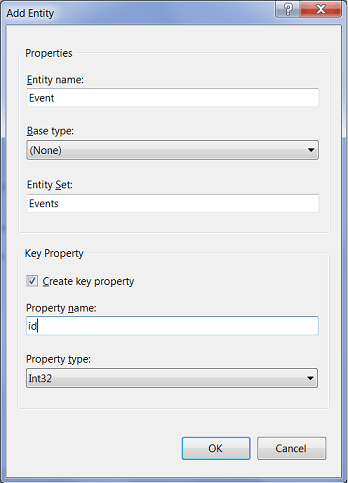
Right-click on the designer surface and add a new entity. Name it ‘Event’. The key name should be id (mind the lowercase):
Right-click on the new entity and add a new scalar property ‘text’. Repeat this process for ‘start_date’ and ‘end_date’ properties.
Here is the created data table to store calendar events:

The benefit of using ADO.NET Entity Data Model is that all property classes are automatically generated in the .edmx file.
Step 3. Generate a Database
Now right-click on the calendar designer and select Generate Database from Model, click New Connection.
A new window with connection properties will pop up. Specify the server name. It should be (localdb)\v11.0 and put in a database name you’d like to connect to. In our case it is MyCalendar.

Click OK and follow the instructions. The Entity Framework Designer will add the script CaledarData.edmx.sql that creates the calendar database schema.
Now right-click on the script and select Execute. Connect your database to the specified server:
That’s it. A database is created.
To generate custom code from the model, right-click on the Calendar.Data.Context.tt in the Solution Explorer and select Run Custom Tool. Repeat it also for Calendar.Data.tt.
Step 4. Install packages via NuGet
Install DHTMLX.Scheduler.NET.MVC3 package via NuGet. It will add the required references, generate a calendar controller and Index.cshtmlx to render the calendar view.
Step 5. Update the Controller
At this stage we need to update the data load and save in the controller Calendar.Controller.cs.
Update data load and processing:
public ContentResult Data()
{
     return (new SchedulerAjaxData(
          new CalendarDataContainer().Events
               .Select(e => new {e.id, e.text, e.start_date, e.end_date})
          )
     );
}
Add the required entities to enable data save:
public ContentResult Save(int? id, FormCollection actionValues)
{
	var action = new DataAction(actionValues);
	var changedEvent = DHXEventsHelper.Bind<Event>(actionValues);
	var entities = new CalendarDataContainer();
	try
	{
		switch (action.Type)
		{
			case DataActionTypes.Insert:
				entities.Events.Add(changedEvent);
				break;
			case DataActionTypes.Delete:
				changedEvent = entities.Events.FirstOrDefault(ev => ev.id == action.SourceId);
				entities.Events.Remove(changedEvent);
				break;
			default:// "update"
				var target = entities.Events.Single(e => e.id == changedEvent.id);
				DHXEventsHelper.Update(target, changedEvent, new List<string> { "id" });

				break;
		}
		entities.SaveChanges();
		action.TargetId = changedEvent.id;
	}
	catch (Exception a)
	{
		action.Type = DataActionTypes.Error;
	}

	return (new AjaxSaveResponse(action));
}
Here is the full code:
using System;
using System.Collections.Generic;
using System.Linq;
using System.Web;
using System.Web.Mvc;


using DHTMLX.Scheduler;
using DHTMLX.Common;
using DHTMLX.Scheduler.Data;
using EventCalendarEF.Models;
namespace EventCalendarEF.Controllers
{
    public class CalendarController : Controller
    {
        public ActionResult Index()
        {
            var sched = new DHXScheduler(this);
            sched.Skin = DHXScheduler.Skins.Terrace;
            sched.LoadData = true;
            sched.EnableDataprocessor = true;
            sched.InitialDate = new DateTime(2013, 5, 5);
            return View(sched);
        }

        public ContentResult Data()
        {
            return (new SchedulerAjaxData(
                new CalendarDataContainer().Events
                    .Select(e => new {e.id, e.text, e.start_date, e.end_date})
                )
            );
        }


        public ContentResult Save( int? id, FormCollection actionValues)
        {
            var action = new DataAction(actionValues);
            var changedEvent = DHXEventsHelper.Bind<Event>(actionValues);
            var entities = new CalendarDataContainer();
            try
            {
                switch (action.Type)
                {
                    case DataActionTypes.Insert:
                        entities.Events.Add(changedEvent);
                        break;
                    case DataActionTypes.Delete:
                        changedEvent = entities.Events.FirstOrDefault(ev => ev.id == action.SourceId);
                        entities.Events.Remove(changedEvent);
                        break;
                    default:// "update"
                        var target = entities.Events.Single(e => e.id == changedEvent.id);
                        DHXEventsHelper.Update(target, changedEvent, new List<string> { "id" });
                        break;
                }
                entities.SaveChanges();
                action.TargetId = changedEvent.id;
            }
            catch (Exception a)
            {
                action.Type = DataActionTypes.Error;
            }

            return (new AjaxSaveResponse(action));
        }


    }
}
Finally, open RouteCongif.cs in the App_Start folder and update the controller route from 'Home' to 'Calendar' as it shown below:
routes.MapRoute(
                name: "Default",
                url: "{controller}/{action}/{id}",
                defaults: new { controller = "Calendar", action = "Index", id = UrlParameter.Optional }
            );
An event calendar with Entity Framework is ready. Check it in the browser and try to create events.
A ready downloadable sample is available upon subscription:
If you find this tutorial helpful, share it with your friends and colleagues and leave your comments below.